ProfitFab v27.7
F9
Many tables have had changes made to the structure of the layout. Some have new fields added, others have been sized differently. When you open tables, hitting the F9 key on your keyboard will set the table to its default settings, which might make the new information visible for you, or correct the table if it is displaying the incorrect information due to structure changes. Remember the F9 key. It is your friend.
QuickBooks Export
With the release of QuickBooks 2019, Intuit has drastically modified their IIF import routines. Files we create during our invoice export for QuickBooks (QB) have been updated to work with newer versions of QB. There are many things that you need to be aware of, however, as it regards these changes.
- QuickBooks has a limit of 31 characters for their item ID’s. These correspond to the Part Number and Product ID in ProfitFab. Even though we have increased our field lengths to 40 characters, you cannot make use of this full length if you export your invoices to QB. For that reason, we are limiting the length of our ID fields to 31 characters if you have selected QB as your accounting package in the System Setup. If you have data that exceeds the length that QB accepts and it has not been shortened, QB will lock up when trying to import that data.
- In a similar fashion to the lengths of the ID fields, QB also has smaller field sizes to hold the FOB and Ship Via data. The FOB is 13 characters, and the Ship Via is 15 characters. We are limiting the size of these fields also as described above.
- QB in the past was pretty loose on their restrictions with things that didn’t exist. For example, if you imported an invoice for a new customer that didn’t exist in QB, then they would create the customer on the fly as part of the process. They would also create items, accounts, vendors, and terms. Now, QB not only will not create those things, they must already exist in QB before you can import data in. To deal with these changes, we have implemented the following features:
- Customers and Vendors – We are keeping track of whether or not you have exported a customer or vendor. If you check the box to Export Customer/Vendor Detail (this is set by default), we will export information on any customers or vendors that we have not flagged as having been exported before. This should allow for a one-time export of each new customer or vendor so that they are created in QB before we export their invoices over. If customers or vendors already exist in QuickBooks, it is possible that a one-time export could overwrite some of the settings in QuickBooks, so you will want to pay attention to that.
- Items – We are treating items the same way as customers and vendors. That is, we are flagging items that we export over so that we only export them once. If you check the box for Export Line Item Detail (again, this is set by default), this will be sure that each item gets created in QB before we try to export invoice information that contains that item. When using this checkbox to export this information, it is important to select the appropriate radio button for Inventory Item Type. If you select Inventory Item, QB will set it up as that, and then future invoices for that item will have an effect on your Inventory Accounts, and will get out of sync over time. If you select either Non-Inventory or Service Item (default setting), QB will not track inventory levels of it, which will make your balance sheet cleaner.
- Terms – Any terms that you use in ProfitFab invoices must exist in your Terms list in QB. It is important that you pay attention when entering these because they are case-sensitive, and additional spaces make a difference – for example Net30 is not the same thing as Net 30 or NET30 or Net 30 days. They have to match exactly. To allow for a more controlled approach, we have added our own Terms list in ProfitFab. You can add terms to our list by going to the Setup pull-down menu and selecting List. Then insert the terms there to match the exact terms you use in QB.
- In order to keep export files from continuously overwriting themselves, we are modifying the filename that the export file uses. The filename that you set up under the System Setup will be the beginning part of the file name. After that, we will append a Date/Time stamp signifying the date and time that the export file was created. So, for example, if you set up the export file path to be C:\sales.iif, and you export a file on August 1, 2021 at 8:30am, the export file will be created as C:\sales_20210801_0830.iif
If you are using QuickBooks 2019, 2020, or 2021 and you run into errors with importing under this new structure, be sure to give us a call so we can help you work through the issues as they come up. Many of the initial errors you might get during an import are one-time in nature, having to do with having things set up a certain way. Once things are set up correctly, those types of errors should no longer be an issue.
Program Enhancements
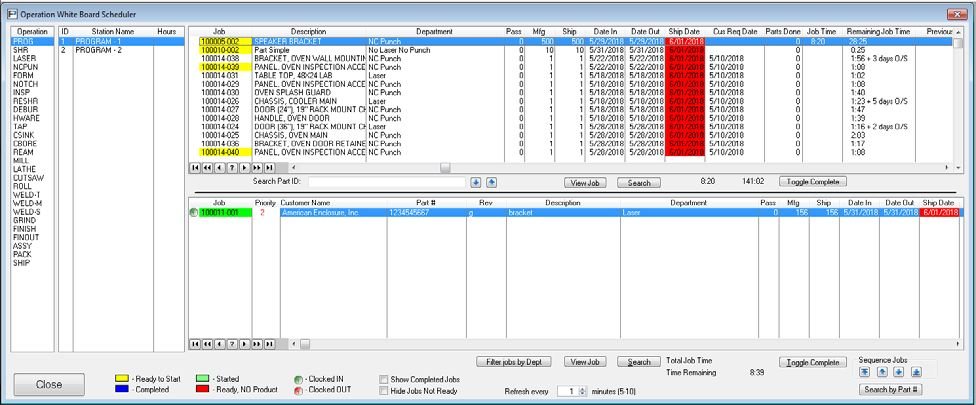
The Operation Whiteboard Scheduler
The Operation Whiteboard Scheduler has been redesigned to provide more scheduling capabilities. You can now use it to schedule jobs to specific stations, and keep track of how many hours are scheduled to each station. You can also use it as a form of visual Active Job Status report. New columns have been added to the table so use the F9 key to update the table view. This only needs to be done once.
The structure of the Operation Scheduler is shown above. The table to the left displays all operations that can be put on part definitions. The second table displays all stations that are visible to the scheduler for the operation that is selected. The top job table displays all jobs for the selected operation that have not yet been scheduled. The bottom job table displays all jobs that are currently scheduled to the selected station.
Information to help you make decisions on how to schedule work through the shop has been added. Each record displays the amount of time needed for the job at the selected operation, and this is used to provide a total amount of time for all jobs at that operation, displayed just under the job tables. The total under the bottom job table represents how much time you have scheduled at that station, and this value is also shown in the station table, so you can see at a glance the loading on all stations for that operation. Each record also displays the amount of time remaining on each job at all operations beyond the currently select operation. If a job contains an outside service beyond the currently selected operation, the lead-time days are also shown so that you can plan accordingly.
In addition to these new columns, there are columns displaying Date In and Date Out. These dates are assigned by running the JIT Scheduler and they represent the latest possible date at which the job can be started or completed at the current operation and still be finished by the Scheduled Ship Date. The JIT Scheduler is described below.
To schedule a job to a station, drag and drop from the top table to the bottom table, and then sequence the jobs as desired using the blue arrow buttons. The Operation Scheduler is visible at the shop clock module so that employees can view the work assigned to them.
Because the new Operation Scheduler is usually dealing with a large amount of data, it does not automatically refresh in real time. There is a Refresh timer at the bottom in which you can set it to refresh data every 5 – 120 minutes. Depending on the amount of data you are dealing with (some shops may have 250-500 active jobs while other shops have 2500-5000 active jobs) and the time it takes to process this data, you should set this value so that it does not spend all of its time refreshing the screen.
If you are using Departments to differentiate work in your shop, you can filter the table by department to show only certain jobs.
A new color coding was added to indicate status of assembly jobs. The color pink in the Job Number field indicates a parent level component where any of the children level components attached to that operation are not yet completed and shipped to stock.
Dates shown in the Whiteboard scheduler are color-coded to give an indication of how soon they are coming. If a date field is shown in red, that date is either today or in the past. If the date field is shown in yellow, the date falls within the number of days that you entered as the ASAP window in the System Setup on the Schedule tab (this is in calendar days, and not necessarily tied to your work schedule). If the date field is shown in white then the date falls out beyond the setting of the ASAP window.
JIT Scheduler
The JIT Scheduler is a new scheduler added to the program to provide very specific information, primarily for the Operation Scheduler. It is based on the Station Scheduler that has always been in the program, so it takes into account things like Global Lead/Trail times, lead times on services and materials, and the capacity of stations with regard to their calendars. The main difference between the Station Scheduler and the new JIT Scheduler is that the JIT Scheduler runs each job as if it were the only job being scheduled. Whereas the Station Scheduler will start to fill up holes in your capacity with jobs being scheduled so that jobs being scheduled last have fewer holes of time available to them, the JIT Scheduler will always find exactly the time it needs to get each job done in exactly the amount of time it needs to finish before the Scheduled Ship Date.
Also, where the Station Scheduler is designed to not go into the past when it schedules, the JIT Scheduler will go into the past and still schedule the same way. What this does, in effect, is that if you do not change the Scheduled Ship Date of a job, or any of the job properties that dictate the amount of time needed, then you will always get the same results for the job whenever the JIT Scheduler is run.
The main purpose for the JIT Scheduler is to define event dates for each job for Scheduled Start date, 1st Operation Start date, and Last Operation End date, and to assign to each operation on the job a Date In and Date Out. These dates are an absolute best case scenario of working the job JIT to meet the Scheduled Ship Date. The Date In/Out of each operation is used in the Operation Scheduler to help determine the order in which you want to manually schedule jobs on the floor.
The JIT Scheduler will automatically run when you verify an order, unless you disable this feature in the System Setup under the Schedule tab. You can also manually run it for all jobs from the Schedule pull-down menu in the program.
Controlling Shop Clock Icons
If you want to control which icons are available in the Shop Clock program, there are now command line switches that you can add to the Shop Clock shortcut on any or all of your shop floor workstations.
To set command line switches, you have to modify the Target path in the Shortcut Properties. To access this, right-click on the shortcut and select Properties, then select the Shortcut tab. You will see the Target: – this is the path to the program that the shortcut is pointing to. You should already see the command line switch /C which tells the program to launch the Shop Clock program instead of the main program. To add additional command line switches, just add a space followed by the switch you want. To add multiple switches, put a space between each one.
The following are valid switches used to hide the buttons in the Shop Clock program:
- /NoIcons – will disable all buttons except for the Shop Clock button
- /NoClock
- /NoAttend
- /NoBiClock
- /NoNestClock
- /NoJobs
- /NoSchedule
- /NoUpdate
- /NoJobQty
- /NoUsage
- /NoScrap
- /NoShip
- /NoReceive
- /NoOpenJobs
- /NoDashboard
If you want to disable multiple buttons with only one command line switch, you can use the switch HIDE followed by a value that indicates the position of the buttons you want to hide. Note that this command line switch does not use the “/” in front of the word HIDE – it is important not to put the “/” with this command line switch. To determine the value to include, look at the icons from right to left and think of them as a bitmap. The rightmost button (Dashboard) has a value of 1. The next button, Open Jobs, has a value of 2. The Receive PO button has a value of 4. The leftmost button, the Shop Clock button has a value of 8192. Add the values of all the buttons you want to hide and use the syntax “ HIDE=value ”
The value of each button is as follows:
- Shop Clock = 8192
- Attend Clock = 4096
- Bilingual Clock = 2048
- Nest Clock = 1024
- Jobs = 512
- Schedule = 256
- Update Job = 128
- Job Qty = 64
- Usage = 32
- Scrap = 16
- Ship Job = 8
- Receive PO = 4
- Open Jobs = 2
- Dashboard = 1
To hide the Update Job, Job Qty, Usage, Scrap, Ship Job, and Dashboard buttons, you would use the command line switch HIDE=249. This would make your Target path look something like
P:\ProfitFab\wpf.exe /C HIDE=249
Note that there are spaces between the path and the command line switches and between each switch, but there are no spaces in the HIDE switch. Also, if your path contains spaces, you will see the path enclosed within double quotes “ “. The command line switches cannot be contained within the double quotes or else they become part of the path, which will be invalid.
Report Previewer
We are using a new report previewer so that when you print reports to the screen you can mark individual pages to send to a printer.
Route Package
We have added a Route Package checkbox to the Part Related Files form. You can use this checkbox to select files you want to print for each job of that part. The Order Form has a checkbox for printing the Route Package. When using this feature, the program will loop through all the part related files to find the ones that are designated as part of the Route Package, and will list them in the Route Package File Table. On this table you can select individual or all files and send them to the printer with the click of a button.
Part Related Files path update utility
You may have need from time to time to move files from one computer to another. As we are saving the path to part related files, these paths would need to change to point to the new location. This utility will do a search/replace on values that are saved so that you can easily update all records with the new path information.
As an example of how to use this feature, assume you have all part related files stored on your server named Server, in a subfolder Files, and from there you have many different folders, perhaps broken down by customer or part. The value stored in ProfitFab would be something like
\\Server\Files\customer\part\filename.pdf
If you were to get a new server and name it New_Server, and you recreate the same path structure, your file would now be stored at
\\New_Server\Files\customer\part\filename.pdf
To update all of the records in ProfitFab to point to the new location, you would run this utility and set it to find \\Server, and you would set it to replace it with \\New_Server .
Part # and Product ID size changes
The size of Part #’s and Product ID’s has been increased to 40 characters. The Shop Code and Source ID fields have also been increased to 40 characters. This is a major change to much of the program and will require you to make some changes to take full advantage of this. First, many of the tables that display the Part # or Product ID need to be reset to show the full amount. This is one of the places where you would open the table and use the F9 key to reset the table, as described at the beginning of this document. You will also need to go into the Report Designer to increase the size of the fields on your layouts if you intend to use longer #’s and ID’s.
To make changes in the Report Designer:
- Open layout to be changed
- Select field by single-clicking it. You should see the little red boxes surrounding the field when it is selected.
- Either right-click and choose Control Properties, or hit Enter Key to bring up the Control Properties dialog.
- In the Format field, you define the picture of the data. For an alphanumeric string, this format is “@S” followed by a number to represent how many characters to display. They should all be currently set to “@S20” to allow them to display 20 characters. You need to change this number to the size you want to display. When setting this up, please consider how many characters you will actually use. Shops asking for a larger field have mentioned needing anywhere from 24-30 characters. If you never anticipate needing more than, say, 24 characters, you should only set the fields in the report layout to “@S24”. The reason for this is that reports like the Quote, Order Acknowledgement, Invoice, etc., only have so much room to work with left to right. If you try to make the field larger than you need, you will probably have to also move other fields around to make room for it. If you never use all 10 characters available to the Revision field, you can decrease the field size on it in your layouts from 10 down to 1 or 2 or how many you actually need. You will also need to adjust any bar code fields that contain this data.
The following is a list of all layouts that contain the fields that have been changed.
| A/R WIP Forecast | MRP Job Number Listing | Product Usage History |
| Active Job Listing | MRP Start Date Listing | Product/Finish Link to Parts |
| Active Job Status Listing | MRP Vendor Listing | Purchase Order |
| Assembly Completion Report | Nest Job Search | Purchase Order Delivery |
| Blanket Order | Nest Route Sheet | Purchase Order on Preprint |
| Blanket Order Acknowledgement | Off Scheduled Jobs | Purchase Requisition |
| Blanket Order History | Off Scheduled Jobs (Production) | Quote |
| Certificate | On Time – Late Ship Report | Quote Estimation Report |
| Completion Report Simple Part | Open Purchase Orders | Quote on Preprinted Paper |
| Completion Report Summary | Operation Detail Time | Receiving Form |
| Customer Active Job Status | Operation Link to Parts | Request for Quote |
| Customer Parts Costing | Operation Schedule (Infinite) | RMA Form |
| Customer Parts Listing | Order | Route Sheet |
| Customer Parts Physical Listing | Order Ack. on Preprint | Scheduled Purchases Report |
| Customer Parts Remfg List | Order Acknowledgment | Scheduled Shipment Listing |
| Customer Parts Shipped Detail | Order Estimation Report | Scrap Report |
| Detailed Purchase Order | Order Time Detail | Service Link to Parts |
| In House Product Reorder List | Packing Slip | Service P.O. on Preprint Paper |
| Inventory Sales History | Packing Slip on Preprinted Paper | Service PO Packing List |
| Invoice | Part Activity | Service Purchase Order |
| Invoice on Preprinted Paper | Part Label | Service Receiving Form |
| Invoice Ship Detail | Parts Done | Service Vendor On Time |
| Invoice Verified Detail | Parts Report | Station Schedule |
| Invoice Working Detail | Physical Product Bin Worksheet | Vendor Invoice Register |
| Job Completion Listing | Physical Product Category | Vendor NCM Form |
| Job Forecast Listing | PO Material Tag | Vendor Product Listing |
| Job Label | Product Cost Listing | Vendor Purchase History |
| Job Time Detail | Product History | WIP Report |
| Product Listings | Product Label | Work In Process Report |
| MRP Forecast Listing | Product Reorder Listing | Work Order Schedule |
Vendor Categories
You can set up to four categories to classify a vendor’s status. In the System Setup under the PO & Inventory tab, you define the category. Three of the categories come with a color-coding of blue, yellow, or green, and one category has no color code. On the Vendor Form, you select which category the vendor is. Vendors that have one of the color-coded categories will show up in all tables with the Vendor Name displayed in the color of their category.
Corporate Documents
The Camera Icon is now available in both the admin and shop clock modules. You can use this to attached links to corporate documents that are required to be accessible to all employees.
Miscellaneous
- Employee pictures can now be JPG and GIF files, as well as BMP
- Added utilities to verify batches of records in Quote, Blanket Order, Order, Invoice, RFQ, RMA, PO, Vendor Invoice, and Vendor NCM files, and to restore orphaned records in Customer, Quote, Order, and Invoice files
- Quote Wins report has been modified to base wins off the Quote # field that is in the Order. This field is automatically set if you import a quote into an order, or it can be manually entered by you
- Date fields in the program can now be increased/decreased one day at a time by using the +/- keys on the keyboard. This only works if the field is currently selected
- A new All User Monitor will show all computers that are currently connected to and running ProfitFab. This will allow you to see if any computers are running the shop clock module when you are trying to get everyone out of the program for maintenance purposes
- Part Definition import can now also import part related files
- Putting Orders on hold – for customer orders, a check box will allow you to put orders on hold. This does not affect the order in any way, but it will make the order record show up in yellow highlight in both the Customer Activity Center and in the Company Order Table so that it sticks out from all other orders.
- Verifying Purchase Orders – a checkbox has been added for security to allow users to verify PO’s
- Verified Orders – more fields have been opened on verified orders to allow you to make changes without unverifying them. You can now change the billing address, the shipping address, the PO#, and the line item quantity. Being able to change these fields will allow invoices made from the order to reflect the changes automatically so you don’t have to manually change the invoice after it has been created. With regards to changing the order quantity, if you are changing an assembly order quantity, you will need to make the change, close the line item, and then reopen the line item so that quantity changes are made to all of the subcomponents of the assembly.
- Dashboard can be opened in the Shop Clock module for employees to see who and what is where.
- Modified the Job Part Related Files to give a description of what happens when you attach files from the job and that they won’t show up at any other jobs for the same part, even though they still show up under the part definition. This was causing confusion for users who would attach parts at the job and then not know why they weren’t showing up at other jobs. The idea behind attaching parts at a job is that the files pertain only to that job, and not any other job. There is now also a checkbox to override this when attaching a file to a job that will let it be global to the part and show up at all other jobs for that part. The Part Related Files Table at the part definition also now has a column showing if files are attached to a single job (use the F9 key if you don’t see this column in the table)
- Alert Notes on jobs and routing will now be triggered to display when using the Nest Clock
- A warning message will be displayed if the line item on a PO does not meet the vendor minimum order quantity
- When shipping a job that still has MRP requirements that haven’t been satisfied, the program will now mark those items as Pull From Onhand so that they remain part of the job record. Previously, any unallocated MRP records would be deleted when the job ships, and the job history would no longer contain that information. If you unship a job, all MRP that had been marked Pull From Onhand will be unmarked and will go back into MRP and need to be dealt with.
- Added the Ship Via field to the Order Schedule setup so that you could alter that from the default setting on all the jobs coming from that order, instead of having to change the jobs one at a time after they are created.
- Added the Nest # field to the MRP Process table (use the F9 key)
- Added an additional user printer setup for Packing Labels, to allow it to differentiate between those and regular labels, as they tend to be different in the first place. You will need all users who print packing labels to go into their User Form and set this printer setting.
- Added a checkbox on the System Setup to make the Department field on part definitions a required field. If you are using departments, this will ensure that all new parts will have the department field set. It will not force currently existing part definitions to have a department set, unless you open that part definition again, at which time it will then require it to be set.
- Added a default shipping address tied to the vendor. If you have multiple shipping addresses and some vendors will always ship to a specific one, this will allow you to set that address for the vendor so that you do not have to change it each time you make a PO to them.
- A checkbox on user security has been added to allow them to update part definitions if they make changes on the job part definition. Currently, this is set to only allow changes if the user has the security to edit part definitions, but now you can set it so that it will not allow them to change the master part definition no matter what changes they make on the job.
- Reformatted the time fields on the Part Routing Forms to have individual fields for Hours, Minutes, and Seconds, and added a field in the System Setup to allow users to choose Seconds with 0, 1, or 2 decimal places. This change might cause you to need to make modifications to some layouts in the Report Designer, specifically to any layouts that print the routing times and the data does not appear to print out correctly.
Reports
Quote and Order Detailed reports
Added new reports to show the details of quotes and orders – showing the line items from each. These go with the current existing reports that just give a summary of the overall quote or order.
Service PO Packing List and Packing Labels
There are new reports for Service PO’s: a Packing List and Packing Labels. The Packing Labels work similarly to the Customer Packing Labels. You will need to import the default layouts into the Report Designer to use these new reports. To add the new layouts to the Report Designer, follow these steps.
Quote Estimation Report in Excel
A new estimation tool for quotes has been added in the Quote Form. This report will put the detail from the Quote Estimation Report into Excel. For assemblies, the data will be combined for the entire assembly so that you can see the totals of labor operations and materials used on the quote.
Miscellaneous
- You can now print a Certificate of Compliance/Conformance from the Company Job Activity Table, and not have to wait for a job to be shipped to print it.
- Added Excel output options on all Red Flag reports
- Added bar code fields to the Packing List report. Bar code fields are the same as what is available on the Packing Labels.
- Customer Alert will now be triggered when printing a Packing List during the shipping of the job, and not just when you print the Packing List from within the invoice.
- Added new fields to various reports. To get new fields on to a layout, you will need to go into the Report Designer and add the fields, as we cannot overwrite your layout file without losing all changes you might have made in the past.
- WIP (Jobs) report now takes into account assembly components on job before the parent operation is marked complete. Before, the parent operation where components were attached had to be completed before we added the cost of the subcomponents back into on job portion of WIP. Now, if the operation is not complete, we will use the sum of the Part Count from time records to determine how many subcomponents to add to the on job WIP value.
- Route Sheet – fixed problems where the material field for structural material was printing the part costing size + webbing size, and where assembly components that had been removed from the job initially were not printing in the assembly component band as being needed.
- On Time Shipping Report can now be based on either the Scheduled Ship Date or the Customer Requested Date
- Vendor lead time added to MRP reports
- Added an email button to invoices for the selected contacts. This is a simple mailto: command which will launch your default email preaddressed to the contact.
- Added Next Operation name to Operation Schedule report
Problems Fixed
- Fixed a problem where deleting a part definition from Customer Activity Center, or a PO from the PO Table would cause the tables to get out of sync, forcing the need to press F9 to restore their defaults
- Fixed problem where the Nest clock would let you clock out of a nest even if it wasn’t clocked in
- Fixed problem with Dashboard that caused it to get stuck in infinite loop because of nested jobs
- Fixed problem where relational integrity would cause the deletion of all contacts for a customer/vendor
- Fixed problem where packing slip was printing line notes whether the setting was selected or not
- Fixed problem where verified quotes weren’t calculating the Margin, Burden, or Profit when being opened
- Fixed problem with RFQ button in Product/Service Form adding multiple line items to an RFQ
- Fixed problem of not stripping ” out of description field in QuickBooks export
- Fixed various issues with QuickBooks export: Vendor invoices were not calculating Due Date and were using Sales account instead of Expense account
- Modified code on Attendance Clock where it wasn’t calculating correctly to make entries into the Employee Activity file for clocking in early/late