
ProfitFab 2017 v26
ProfitFab version 26 is now available and has a whole new look from previous versions. Screens have been streamlined and simplified. Users can control screen size and font settings through their own User Form, to allow for larger, easier-to-read text. Users can also set up their own background image to replace the default image as a way to personalize the program.
Program Enhancements
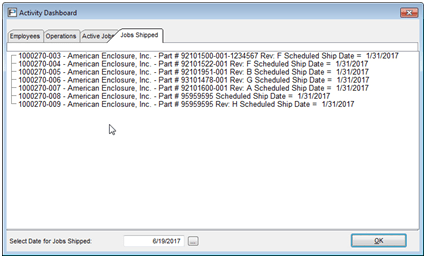
- Added a dashboard to give real time data about jobs being worked on, who is working where, and jobs being shipped during the day. The dashboard looks at clock records to give you an idea of what is currently going on out on the shop floor. The data in the tables will refresh approximately every two minutes to give you current information. If you do not wish for a user to view this information, you can use security settings to disable it. The checkbox is located on the Setup-Maintenance Tab of a user’s security.
The Employee Tab shows you all employees who are currently clocked into either the Attendance Clock, the Shop Clock, or both. The employee will be listed first, followed by entries for the attendance clock and the shop clock. For the shop clock, it will show you what operation they are clocked into and what time they clocked into it. If there is also a job clocked into that station, it will show you the customer, job number, part number and job scheduled ship date. Additionally, it will calculate the actual time accumulated at that operation and compare it to the estimated time for the operation and show you the percentage of time accumulated. If the percentage exceeds 100% (actual time is greater than estimated time) then this line will be highlighted in red so that it stands out visually and you can investigate as needed.
The Operations Tab shows information similar to the Employee Tab, however it is organized by operation. At each station for an operation that has either an employee, a job, or both, clocked in, the table will display that information so that you can see who is working on what and where. On this tab, the employee and job information is highlighted in red just to make it stand out more visually, not because there is some problem that you need to investigate.
The Active Jobs Tab shows you all jobs currently clocked in and also shows you where it is clocked in and what employee is there working on it.
Finally, the Jobs Shipped Tab will list all jobs that have been shipped and closed out. This information is date specific and you can select a date at the bottom of the table to look at all jobs shipped and closed out on that date.
- Some screens have been redesigned to allow for easier access to more important information. This also allows screens to display more information if you use Window’s Ease of Access features to make screens larger and easier to read. The screens that are redesigned are the Part Definition Form, Quote Form, Order Form, Blanket Order Form, Invoice Form, and Purchase Order Form. On these forms, the most pertinent information is kept on the first tab and visible when you open the form. Other information has been moved to secondary tabs. A lot of this information is default info that comes from customer settings and never really gets changed. Below is an example of the Part Definition Form.
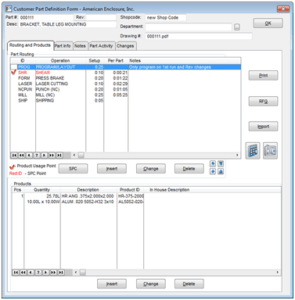
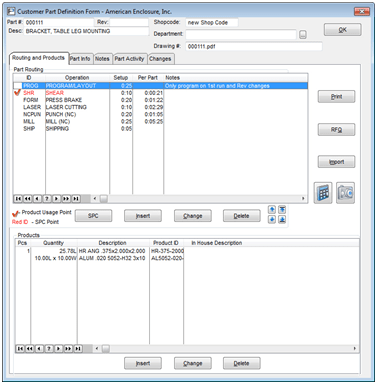
As you can see, the routing and products tables still appear on the first tab, so this is what you will see when you open the part definition. For quotes, orders, blanket orders, invoices, and purchase orders, the line item tables will all be on the first tab and what you will see each time you open them.
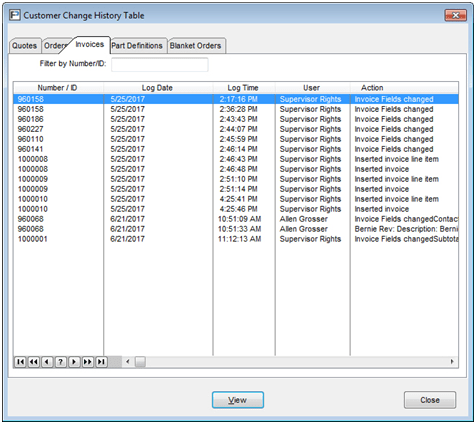
- Audit features added to various parts of the program. On version 25, the audit file feature was removed from the program because of problems that it caused versus the benefit that it provided. On this version, we are beginning to introduce our own version of the audit feature. We have begun with the most common items: customers, part definitions, quotes, orders, invoices, and purchase orders. The program will begin to record the history of each item starting with the insertion of the record. This feature will not be retroactive to cover all of your existing records, but it will begin to record the changes as they are made.
Changes made to each record can be found on the table of that record. For example, changes made to an order will show up on the Changes tab of that order.
You can view each record in a read-only screen. The program does not allow anyone, even users with Supervisor rights, to edit or delete the records.
Because customer records are parents of records from the other items, you can see all changes made to any of their children records from the Customer Form. The Changes tab on the Customer Form will show changes made only to that customer record. Clicking on the button to View All changes will open a table with all changes made to that customer’s parts, quotes, orders, blanket orders, and invoices. This is also where you would go to look for items that have been deleted, since obviously you won’t have those items to look for anymore.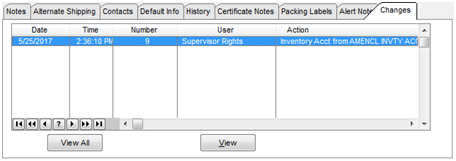
- Added features for emailing forms to customers and vendors. In the User Form, you can enter default text that you want to appear in the body of the email for each one of the forms being sent out. You can also enter a default signature to be used for all forms. Additionally, for quotes, you can check a box that will replace the quote number in the subject line with the part number and revision of the first line item on the quote.
- Added Minimum Charge field to Vendor Product Form. Initially, the minimum charge was set to each service, and changing the vendor on a service on a part definition did not change the minimum charge for that service. If you use multiple vendors who each have a different minimum charge, changing vendors will select the correct minimum charge for that service
- Modified the User Printer selection to allow for ‘None’ if the user cancelled the printer select option. Having ‘None’ should allow one to print to the default printer. This is an issue when users log into computers that are not their regular workstation, as the printers may have different names from one computer to the next.
- Allow opening a PO from the Purchase History table within the Product/Service Form, and also from the MRP tab on shipped jobs
- Tables will now save the width settings of columns so that if you resize them, they will open back up at that width. If the table settings get jumbled, you can restore the default settings by pressing the F9 key while that table is on the active window.
- Added the option to change a customer’s billing address on the invoice. Normally, a customer would only have one billing address, although they can have any number of alternate shipping addresses. This is an accounting issue, so through the years the billing address has been set for only one. Since we are not trying to do accounting, you can now set alternate billing addresses on the order and the invoice. If you use the invoice export feature to send your invoices to your accounting package, and you modify the billing address, you need to make sure that your accounting program will not have a problem with that
- Added email buttons to the Quote/Order/Invoice/PO tables so that you can email the forms to your customer without having to open them
- Added a quantity field to the Nest Job file so that you can modify the quantity of parts being run on a nest. Before, the nest module automatically assumed the full manufacturing quantity for all jobs being put on the nest. Now, it defaults to that value, but you can change it from the Nest Material Table to account for additional parts, or for parts that may have been run individually beforehand. If you do modify the quantity of the parts being used, make sure that you run through the Calculate Material and Calculate Time routines afterwards so that the new quantity is used in the calculations.
- Added a short notes field to the Operation Complete window that allows an employee on the shop floor to append a short note to the Job Notes field. The note will be added at the end of the current notes, potentially include the employee’s name followed by >> and then their note.
Reports
- Added an Excel print of Purchase History for Services to the Purchase Order History Table
- Added Excel output to the Product Usage History report
- Revamped the Efficiency Report and added Excel output. The Excel output contains all of the job data which is used in calculating the efficiencies. The printed report now only gives you the employee efficiency, not the operation or station efficiency. With the data in Excel, you can sort on Employee, or Operation, or Station, then use the Subtotal feature to sum the Estimated and Actual Hours columns at each change in the sorted field. This will give you the same data as the printed report.
- Added Customer Requested Date to excel output of Completed Jobs, Active Job Status, On Time Shipping, Active Job Listing, and Completion Summary reports.
- Added the ability to print job labels from the Operation Complete ? screen. This feature was for a shop that wanted to reduce/remove paperwork so they eliminated the route sheet, and the labels are used to identify job parts as they move through the shop floor. Also added Bin Location and list of operation ID’s to the label fields.
- Added a Customer Material Usage report (to Excel only) to the Inventory tab of the Reports Folder. This report looks at the amount of material required according to a part definition, then looks at how many parts have been shipped during the time frame selected to give you a total of how much material was used for that customer
- Added a filter to the Active Job Status Listing report to look for jobs that contain customer supplied material
- Added a total weight field to the Packing Slip reports. The weight is calculated based on the individual weights set up on the Part Definition form.
- Added bar code fields to Packing Slip reports. The fields available in bar codes are
- Customer OEM Number
- Part ID
- Part Revision
- Line Number
- Part Drawing Number
- PO Number
- Invoice Number
- Manufactured Date
- Ship Quantity
These fields can be added to the Packing Slip reports in the Report Designer
- Added Incomplete On Hand field to excel output of Customer Parts Costing Report so that you can find that information. No other reports were looking for that particular value.
- Added the Routing Notes and Service Specs Notes fields to the Quote and Order Estimation Reports
- Added Cumulative Received and Date Received fields to Open PO Report in Excel
- Added Excel output for the Employee Productivity Report
Problems Fixed
- Fixed problem in quantity calculator of Part Routing Form and Job Part Routing Form
- Fixed problem where you couldn’t change Operation Type on the Default Operations Form
- Fixed problem where going into part definition and then the on-hand audit when you don’t have supervisor rights caused going back into other part definitions to get locked up as if you had no security
- Fixed problem of updating costs between the vendor invoice and the PO when dealing with services that have different costs for the same service item. This is a problem since costs can vary from part to part and often end up on the same PO and Invoice
- Fixed problem with shipping jobs and having it update material usage. It wasn’t populating the material table in most cases involving assemblies
- Fixed problem in nest module that would indicate the total number of parts completed each time a nest was clocked in. This resulted in multiple time records for each job on the nest, each one showing the full quantity of parts being completed. The nest module now will only update the quantity of parts completed when the nest is marked complete.
- Fixed problem with how the Nest was treating MRP records in cases where the material from the nest was already on a PO. It wasn’t marking the material pull from on hand the way it was supposed to and the MRP Adjust was removing those line items
- Changed the Default Grab Dimensions and Default Webbing Dimensions to only apply to sheet material
- Fixed problem with Job Nest Form not resizing properly
- During invoice export for QuickBooks, having a “ in an ID or Description field would result in data getting out of alignment in QuickBooks since they interpret the “ to mean something else. In the past we would always recommend against using the “ to indicate inches, but now we are looking for the presence of the “ in those fields before we export them, and if we find them, we simply remove them. This will prevent QuickBooks from getting out of alignment and creating bogus accounts or other entities. It will also potentially cause QuickBooks to create new items if your item in their system contained the “ as part of its ID.
