
Creating a Quote
During lunch with a customer, Bob Baker from Debco Manufacturing hands you a cocktail napkin with the layout of a table that he wants made. He asks for a quote for 10 pieces, 50 pieces, and 100 pieces. Bob is a relatively new customer, but he has previously sent a couple of jobs to you and has been satisfied with your services so far.
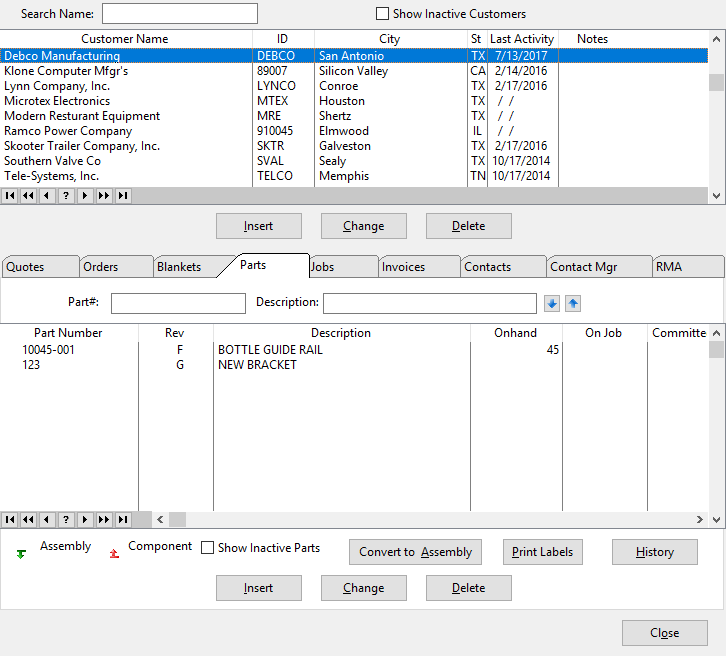
 In order to provide him with the quotes, you need to create a part in ProfitFab first. You give the cocktail napkin and information necessary to Gina, whose job, among other things, is to enter new parts into the system and create quotes and orders. The minimum information she needs is the Customer Name, the Part # and the Revision. Gina opens the Customer Activity Center and selects Debco Manufacturing from the Customer Table, then clicks on the Parts tab. She can see from the screen that Debco already has had previous parts defined. If she wanted, she could view the history of Quotes, Orders, Invoices, and Jobs for any of the parts built for Debco, simply by highlighting the part and clicking on the appropriate history button. To create the new part for Debco, Gina clicks on the [Insert] button.
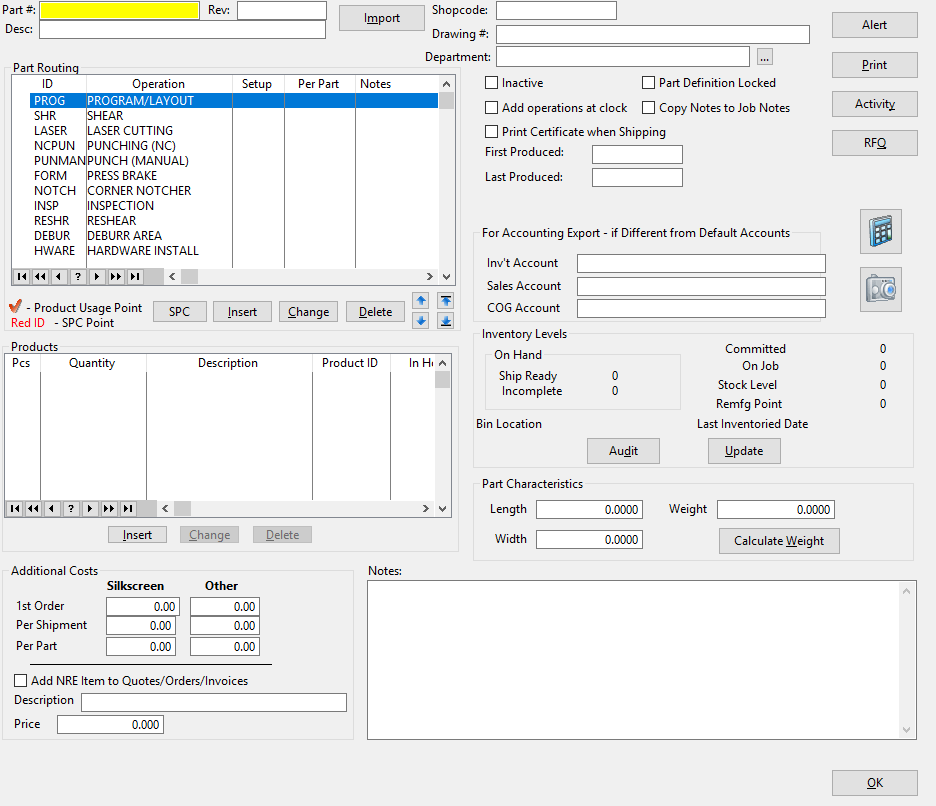
A window will open asking Gina to Select Type: her choices are [Simple Part], [Assembly], or [Cancel]. She selects [Simple Part] (assemblies are discussed later in this manual). ProfitFab now opens the Customer Part Definition Form. The Part # field is highlighted in yellow, indicating a required field. Gina enters the part # you gave her. She has now entered all the information she has, so she clicks [OK] to save the part in the file.
Gina can scan the napkin to make an image file of the drawing and attach this file to the Part Definition by selecting the Camera button.
Once the part is created, it is placed on a quote, even if there is no data on which to base a cost. You can use this method of creating Part Definition “skeletons” to quickly create parts to quote without investing the time to detail the parts out. For parts that you quote but never build, you do not want to invest any more time than is necessary to get the quote to the customer. When purchase orders come in for the part, then you can take the time to add all the necessary details, knowing that you are going to build the part and make money on it.
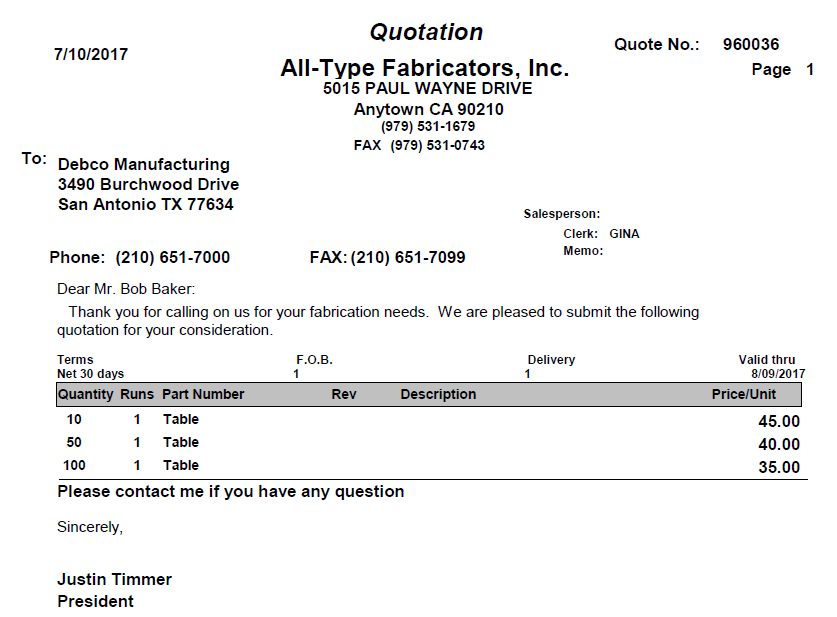
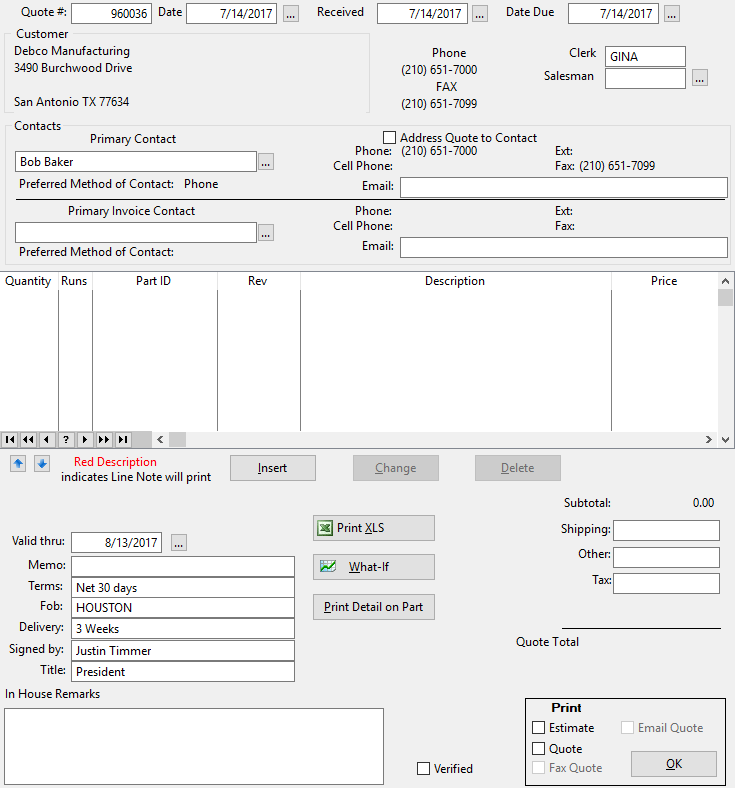 Bob Baker asked for a quote for quantities of 10, 50, and 100 parts. Gina has created a “skeleton” Part Definition and now it is time to create the quote. She returns to the Customer Activity Center, selects Debco Manufacturing from the customer list, then selects the Quote tab, which displays all quotes in the system for Debco. By clicking on the [Insert] button next to the table, she creates a new quote for Debco. The Customer Quote Form opens with the Quote #, today’s date, and Debco’s information already filled in.
Also filled in is the ID of the clerk who is creating this quote, a date through which the quote is valid, terms, FOB (Freight On Board), typical delivery turn-around requirement, and quote signature. (This information is established during set up and can be changed as needed.) Gina clicks the ellipses […] button next to Contact and selects Bob Baker from the table.
To enter parts for the quote, she clicks on the [Insert] button to open the Quote Line Form. For the initial quantity, she enters 10 and leaves 1 for the number of manufacturing Runs. Clicking on the ellipses […] button between the Rev and Description she opens the Customer Parts Table for Debco Manufacturing. Gina clicks the part she created, with the Part Number “Table”, and then clicks the [Select] button to bring that part back to the Quote Line Form. She then enters the additional quantities to be quoted.
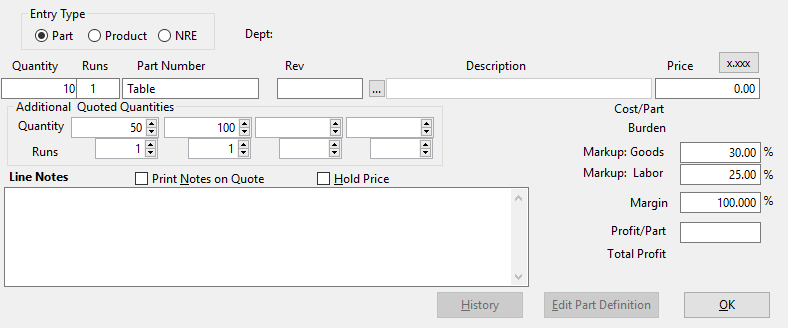
 When Gina clicks on the [OK] button in the Quote Line Form, the program adds 3 line items to our quote. These line items are all for the same part, “Table”, and for the three different quantities to be quoted.
Notice there is no Price for the quoted parts. This is because we created a “skeleton” part definition with nothing to calculate the cost of the part. In ProfitFab, the cost of the part is calculated and the price is based as a markup of the cost. In situations where we are quoting a part for the first time, our estimator, Greg, will actually enter prices for the parts being quoted. Also, the Verified checkbox is disabled. Security settings for Gina do not allow her to verify quotes. Verifying quotes is assigned to the quoter/estimator.
It took Gina approximately 3 to 5 minutes to create a “skeleton” part definition and a quote for the part. When she clicks the [OK] button, this quote will show up in the Open Quotes folder as a flag for the quoter/estimator to take action on it. Gina clicks [OK] to save her work.
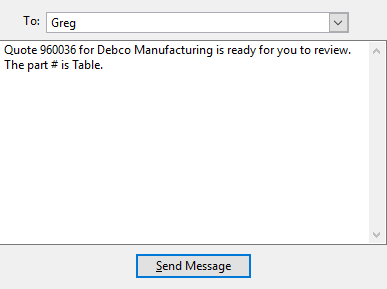 Alternatively, Gina could use the internal messaging system to send a message letting Greg know that the quote is ready to be looked at.
 This is what Greg would see if Gina uses the internal message system.
Finishing the Quote
Since Greg normally works with open quotes, he usually has the Company Quote Table open on his desktop. As soon as Gina saved the open quote, it appears in the Company Quote Table on Greg’s computer.
Now he sees two quotes that need to be verified. His approach to updating and verifying quotes will vary depending on the nature of each quote. If a part has been quoted and manufactured in the past, he can quickly verify the quote since the part definition has already been detailed and potentially reconciled with actual labor data from the shop floor. For new parts with incomplete part definitions or parts that have never been manufactured, Greg needs to estimate the cost and establish a price to quote.
Greg can use ProfitFab to estimate the cost of Debco’sTable. Building the Part Definition may take about 15-20 minutes to define labor, machine, and material requirements will determine the cost of building the part. But Greg has been estimating parts for years and has other methods that he uses to quickly estimate the cost/price of Debco’s Table. He opens the quote for Debco Manufacturing and pulls out the drawing of the part that you gave him. He quickly estimates prices for the given quantities and opens the Quote Line Form for each line item to enter this information. Once this is done, he verifies the quote by clicking the Verified box. This enables the Email Quote box in the Print section. He selects this option and the quote is emailed to Bob Baker. Once he is finished with Debco’s quote, he moves to the next quote in the table. Total time elapsed for Greg will vary with the complexity of the part being quoted, but most average 5 to 10 minutes per quote.
For the purpose of this example, the quoting phase was broken down into 3 steps:
- Create a skeleton Part Definition
- Create a quote with the Skeleton Part Definition and no price
- Estimate the price to quote using whatever means you already have in place for estimations
However, there are many different ways to approach creating Part Definitions and quotes. You can create Part Definitions from within a quote. You can detail the Part Definition up front to find the estimated cost and price. Or, you can even bypass the quote altogether and create a Part Definition to put directly onto an order, thereby creating jobs immediately. The method you use should be what is most comfortable for you.
The Quote, and all other reports in ProfitFab, can be customized to look exactly how you want them to look using the built-in Report Designer.
Detailing the Part Definition
Gina receives the purchase order from Debco Manufacturing for 50 Tables referencing our quote number 960036 and reflects a price of $40.00 per part. To enter the order into the system, Gina selects Debco Manufacturing from the Customer Activity Center and clicks on the Order tab to display their orders. Next, she clicks the [Insert] button to create a new order for them. This opens the Customer Order Form with Debco’s default information filled in.
Since the purchase order refers to the quote they were sent, Gina clicks the [Import from Quote] button and selects that quote from the table. This brings in all the line item information that was created on the quote. Since the purchase order was for 50 parts, she deletes the lines for the other quantities. The P.O. Number field is displayed in yellow, indicating that Debco is setup to require a purchase order number on their orders. All of the information that she is responsible for entering has been entered. She clicks [OK] to save the order in the Open Orders table and it is ready for Greg to verify.
Part of Greg’s job description as an estimator is to verify quotes and orders. He monitors the Open Quotes and Open Orders tables. He reviews any open orders that appear in the table looking for the following things:
- Have the parts been built before?
- Are the part definitions detailed?
- Do the part definitions reflect the current revision?
- Are drawings up to date and attached to the parts?

 For orders containing parts that have been previously built, Greg checks for the accuracy of the information that makes up the part definition. For orders containing new parts that have not been built in the past, he is usually the person who builds the details into the Part Definition. Making the part definition as accurate as possible before creating jobs will have a positive impact on scheduling the work on the shop floor, ordering the right amount of material, and establishing a realistic ship date.
From the Company Order Table, Greg selects Debco Manufacturing, order number 970011. He finds the single line item and opens it with a double-click. In the Order Line Form he sees that there is a price, but no cost – a sign that he needs to add detail to the part definition. He clicks on the Hold Price box to save the price and clicks the [Edit Part Definition] button.
Since the Part Definition has no routing associated with it, the program prompts him for whether or not he wants all default routing brought in. Bringing in the default routing makes it easier to add the individual operations required for the part, so he answers [Yes] to import all.
The Part Definition consists of four general areas. At the top is general information related to the part. To the left is the routing table, which contains the labor operations necessary to build the part. To the right is the Products table, which adds material costs to the part. And, finally, at the bottom are part-specific notes and additional costs.
Greg needs to add routing and materials. The operations come from the Default Operations Table that is available from the Setup -> Operations pull-down menu. The operations in that table are sequenced to match the normal flow of work through the shop so that entering them into the part definition is as easy as going down the list and selecting the necessary operations. In the table above, you will also see that there are no Setup times or Per Part times entered for any of the operations. Putting time on to an operation is what holds it to the Part Definition when you are ready to save your work. When closing a part definition, any operations in the table without times allotted to the part are removed from the part definition.
ProfitFab includes several types of built-in calculators to assist in determining the time needed per part for an operation. Both Detailed Calculators and Speed Calculators can be set up for any operation created in ProfitFab.
 All Part Definitions at this shop begin with the Program/Layout operation. We use this operation to track time on writing all required CNC machine code, to verify that drawings match revision levels, to verify material requirements against the drawings, and to perform any other in-house pre-production processes required. Greg puts this operation into our part definition by double-clicking it in the Part Routing table. This opens the Part Routing Form with Program/Layout already selected. Our Program/Layout operation defaults to 15 minutes of setup time and the amount of time required to perform this operation is independent of the number or parts being manufactured (there is no per part time needed). Greg adds this operation to the Part Definition by clicking the [OK] button to save his work.
Now, Greg needs to add the remaining operations to the part routing table. Referring to the drawing attached to the part, Greg sees that they will need to punch out the table tops, bend them, cut the table legs, drill holes in both the tops and legs for attachment, send them out to a finisher for powder coating, assemble, and ship them.
On the Part Definition Form, Greg finds the Punching operation, called Punching (NC). He doubleclicks this operation to open it in the Part Routing Form. The form opens and shows us with a default setup time of 30 minutes. He decides to change the Setup Time to 15 minutes and estimates that it will take 30 seconds per part to complete this operation.
He will also add material to this operation. Aluminum sheet will be pulled from stock for punching. To add this material, Greg clicks the [Insert] button under the Products Table located at the bottom of the form. The Part Product Form opens and he needs to find the product to add. He clicks the […] ellipses button next to the Product ID to open the Product/Service Table. He clicks the Sheet tab and then selects the Category tab to view only Aluminum sheet material. There he can find sheet stock of .040 Aluminum, which is 2-dimensional type material.
 Here, Greg sees that he has a couple of choices to use for a product. The 40 Gauge aluminum that we have comes in either 4×10 sheets, or 4×12 sheets. Since the dimensions on the table require a 17”x17” piece of aluminum, a quick calculation shows that he can get a minimum amount of drop out of the 10’ sheet. He selects the 5052-H32 in 4×10 sheets for our part by highlighting it and then clicking the [Select] button. This returns him to the Part Product Form, which has been updated with the type of product he has chosen. Now, he will define a few more things so that ProfitFab can compute the material cost of the part due to this product. He will determine how to charge the customer for the material, and needs to define how much of the material is used to make a part.
 The Quantity Calculator contains the fields needed to set up the costing information for this particular part. With the size of the part not lining up exactly with the sheet, there will be some material left over on each sheet used. Greg is only going to charge Debco for the amount of material required to make the part. (To pass the cost of that material to the customer, Greg could choose the Drop + Part option.) Next, he enters the single part dimensions into the Part (Costing) Size fields and the amount of material needed between consecutive parts with the punch being used is 0.5” in either direction. The punch has no grab dimensions, which are used to account for material lost from parts due to machine holding requirements in either direction. We will use the full sheet so the blank size and sheet size are the same. After entering the values, ProfitFab calculates 12 parts per blank. The calculated price for a part is $1.6634 and 0.0535 sheets per part will be used. Greg clicks [OK] to save his work and return to the Part Routing Form. There, he clicks [OK] to return to the Part Definition Form, and the NC Punch operation has been added to our part definition.
Greg continues adding the operations that are needed on the part definition and adding materials to the operations where needed. At the Cut Off Saw he adds aluminum square bar for the legs and at the assembly operation he adds rivets to fasten the legs to the table top. Adding the aluminum square bar is very similar to the aluminum sheet that used for the table top with the exception that it is 1-dimensional. It only needs to be defined in terms of its linear component and he indicates there are 4 legs for each part being built. Adding the rivets is simply a matter of entering how many are required for a part.
These screen shots show the Part Product Form for each of these items.


Greg adds the Finish (Outside) operation to the Part Routing table. In the Part Routing Form for this operation, he will estimate the amount of time needed to prepare the parts to go to the vendor, not the time required at the vendor itself. The bottom portion of this form is where the actual service and its cost are defined. He clicks the ellipses next to the Service ID to open the Service table. From this table, he selects the Powder Coat per piece which is how City Paint Shop quoted him. After returning to the Part Routing Form with the service selected, he clicks the ellipses next to the Vendor ID to select City Paint Shop from the list of vendors who perform this service. Back on the Part Routing Form, he enters the price quoted to him of $12.80 per part into the Quantity price break field. The service had been setup with default values with price breaks per 100 pieces. Since the order is for 50 pieces, he enters the price into the first field. (He could have entered more actual price breaks and prices for potential future runs of the part, but since he doesn’t know if there will be subsequent orders, he only enters what is needed for this order.) After entering the information, the program calculates the Service Cost per Part and the total service cost for 50 parts.

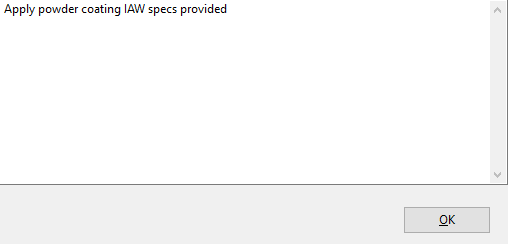 Finally, he clicks on the Specs button to enter a detailed instruction for the vendor which will print on the Service PO when it is issued.
Once Greg is satisfied with the setup of the outside service, he clicks [OK] on the Part Routing Form to return to the Part Definition Form. If the Finish (Outside) operation was not placed in the correct order in the Part Routing Table, the arrows under the table will move the routing to the correct position in the table.
 He can quickly see at a glance all the information that he has entered in the system. The Part Definition Form displays the operation steps with setup and per part times, material required for the job, and routing steps with material usage. To check pricing, he clicks the Cost Calculator button in the upper right corner.
 The Part Cost-Price Calculator gives a breakdown of the cost of a given quantity of parts into the various components shown. There are 3 columns of information—two of them are based on default quantities from the System Setup menu and the 3rd column is variable. By default, since we are working within an order for 50 parts which is initially used in the variable column. Greg can change the quantities to see what affects it has on the overall cost-price of the part. He can also modify the part’s markup percentages or add a manufacturing burden factor to the part. He can see that the price for 50 parts is quite close to what he had estimated. He clicks [OK] to return to the Part Definition where he again clicks [OK] to save his work. This returns him to the Order Line Form where the new costs are calculated and the markups are recalculated to result in our held price of $40.00 per part.
On the Order Line Form, Greg clicks [OK] and returns to the Customer Order Form.
 |
Now that the part is defined, Greg will set up a shipping schedule and create a job. To set up the scheduled shipment, he clicks the [Shipping Schedule] button below the table. This opens the Auto Schedule Form. He can set a global ship date for orders with multiple line items or for the single item from this order. He enters the date by clicking the ellipses button next the Global Shipping Date field and clicking the date on the calendar popup. Once the [OK] button is selected the order is ready to create jobs.
To create the job, the order must be verified. Verifying the order implies that everything on the order is as accurate as possible. In addition to creating a job, verifying on order also creates MRP requirements for material purchasing and it optionally adds the jobs to the production schedule. Making sure that the Part Definition is as accurate as possible will have an impact on these areas. To verify the order, Greg checks the Verified box which enables the printing of several reports related to the order. He can fax, email, or print to mail the Order Verification to Debco. (He can bypass these reports and they can be printed/sent by another person.) Greg checks the boxes to print the Route Sheet and the Order Acknowledgement. The Route Sheet is sent to the CAD programmers and the Order Acknowledgement is given to Gina to send to the customer.
The Order Acknowledgement can be faxed, emailed, or printed to mail to the customer directly from ProfitFab.
To set up multiple shipments of an item or to set up multiple shipping dates for different parts on the same order, use one of the following methods:
- Set the Global Shipping Date to the date when most of the items are to be shipped.
- Select line items with alternative shipping dates and click [Shipping Schedule] to modify the ship dates for those line items only.
OR
- Click the [Cancel] button on the Auto Schedule Form to begin setting up individual shipments for the selected line item.
- Select each line item and click [Shipping Schedule] to set up shipments.
When setting up shipments, you can also set up quantities to be manufactured, shipped, and pull from stock. You can set up jobs to be completely pulled from stock, which will produce a “From Stock” Route Sheet, containing only the operations you designate to print on From Stock routers.
Purchasing Material
Max performs all purchasing functions for our shop. He has set up the inventory into two types based on how he orders the material. The first type is material that is kept in stock and is ordered based on Min/Max stock levels. The second type is material that is ordered specifically for jobs and not necessarily kept in stock, although from time to time will have some in stock.
When Max comes to work, the first thing he normally does every day is to check on what materials need to be ordered for stock, what purchase orders are late in being delivered and causing problems with jobs, and what purchase orders are due to be delivered so that he can check on their status.
To accomplish the first two tasks, he runs two Red Flag Reports: the Scheduled Purchases Report and the Product Reorder Listing.
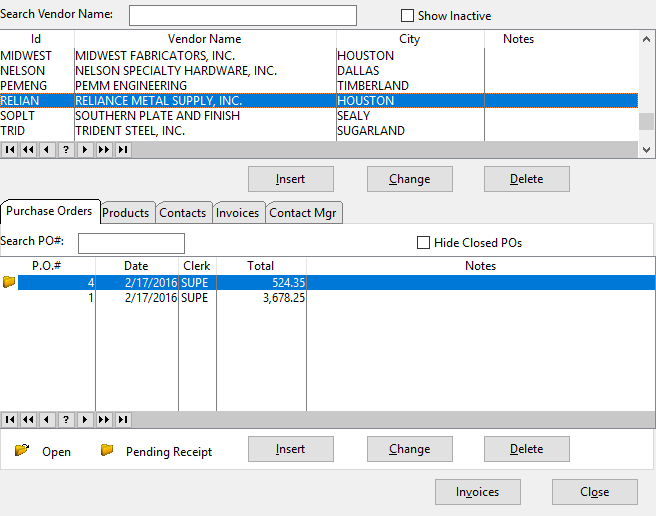
 From the Scheduled Purchases Red Flag Report, he finds that he needs to look at PO # 4 and follow up with the vendor to find out the status.
From the Product Reorder Red Flag Listing he sees there are several things to order to get them back to their Stock Level. Material only shows up on this report when the following conditions are met:
- Product has a Stock Level and Reorder Point set
- On Hand + On Order – Committed > Reorder Point
The Stock Levels are set at what Max wants to keep in stock. The Reorder Points are set based on usage of the material and the lead time it takes for the material to arrive, so that as the new material is being delivered we are just running out of what was in stock.
This report shows Max the quantity he needs to order to get back to his required Stock Level.
![]()

 To create a Purchase Order, Max goes to the Vendor Activity Center and selects the Vendor for the PO. He selects the Purchase Orders tab and clicks [Insert]. ProfitFab asks if the PO is for Outside Services or regular material. Max clicks [No] on the system message—this PO is for regular material.
Max could also create a Purchase Order from the Purchase Order Table.

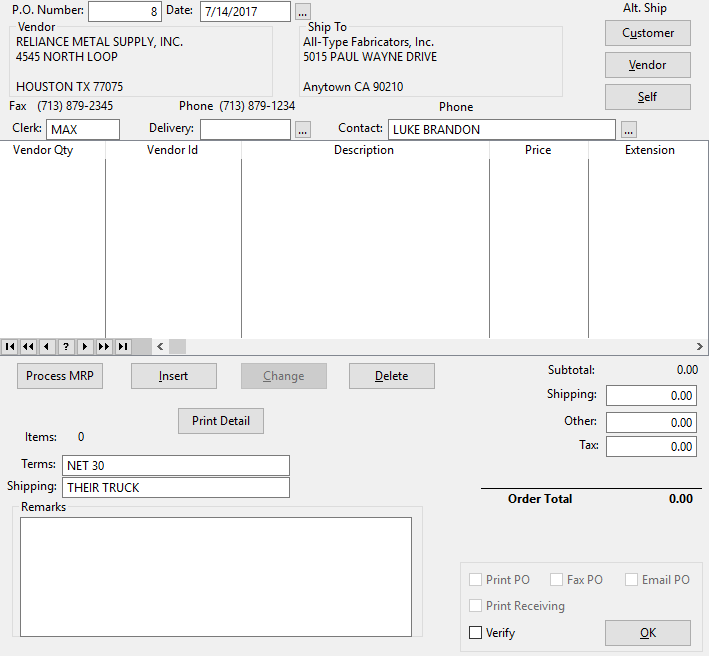
The Purchase Order Form opens with the selected Vendor’s default information, such as Terms and Shipping. To insert parts onto the PO, Max clicks the [Insert] button. This opens the Purchase Order Line Form (Detail).
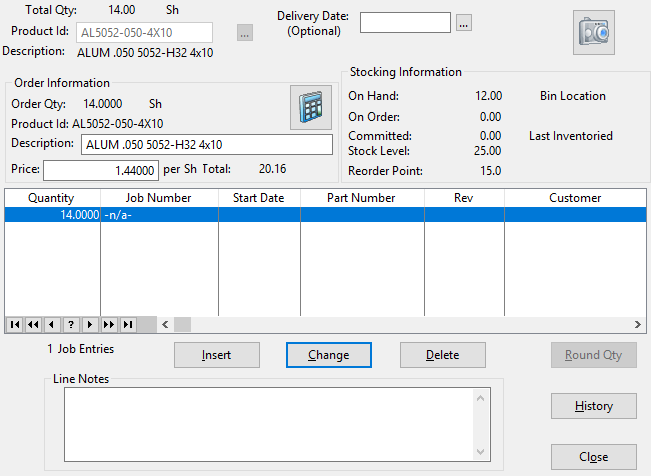 Using the Product Reorder Red Flag Listing, he enters products onto the PO by typing the Product ID into the field where information about the product is automatically retrieved. Then he enters the quantity for the order by clicking the [Insert] button and entering the amount into the Purchase Order Line Quantity Form. After clicking [OK], he returns to screen shown here. Then, he clicks the [Close] button to return to the Purchase Order Form.
Max continues to add line items to the PO until he has added all that is needed according to the report.
 The finished PO looks like this. He clicks the Verify checkbox, clicks the Print PO checkbox, and [OK]. The Purchase Order prints and is sent to the vendor.
Next, Max checks the purchase orders that are due in the next few days by running the Purchase Order Delivery Listing. This is run from the Reports Folder under the Inventory tab. He calls the vendors to check on the delivery status for the listed items.

After checking on the status of deliveries, Max investigates what materials need to be ordered for jobs. Material that is needed for a job is put into MRP (Material Resource Planning) when the job is created. There are several formats of MRP reports designed to assist Max in purchasing. These reports are:
- MRP by Product ID
- MRP by Job Number
- MRP by Vendor
- MRP by Need to Order by Date
These reports are accessed from the Inventory tab of the Reports Folder. Examples of each report are shown below, reflecting some or all of the material needed for our Debco Mfg. Job.


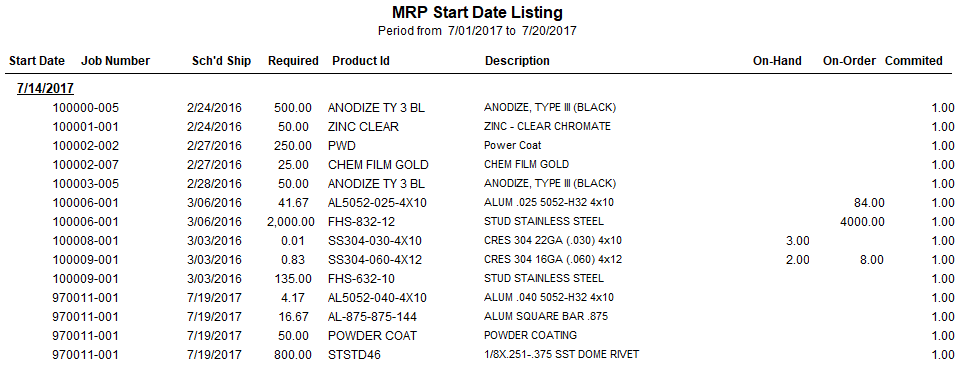


MRP reports are designed to fit different ordering preferences. Shops that like to order material specifically for jobs will use the MRP by Job Number. Shops that only want to order material when it is needed will use the MRP by Start Date. It is not necessary to run all the reports to determine your material requirements.
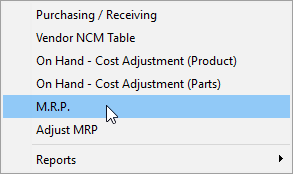 Max opens the MRP Process Tables from the Inventory pulldown menu.

Max views the MRP Process Tables in Job Start Date order. He reviews the surplus items and tells the system that it’s to be pulled from stock and doesn’t need to be ordered. This is achieved by selecting the items that have a green background on the status column and pressing the [Change] button.
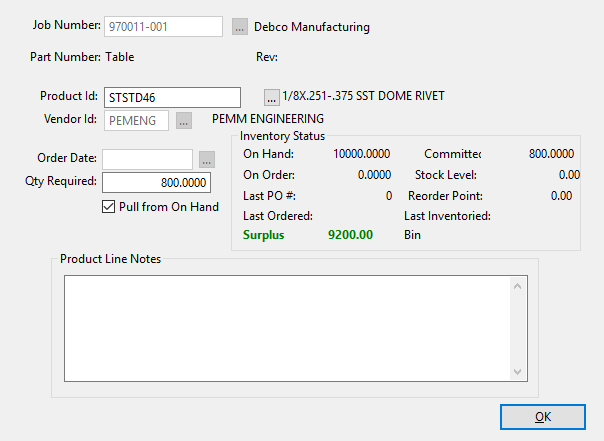 On the MRP Form, Max checks the box for Pull from On Hand. This will remove the item from MRP.
Max will continue to process all the surplus inventory items within the start date range of products he wants to order from his vendors. It is not necessary to process surplus inventory items scheduled to start far in the future because there may be order changes, cancellations, and part revisions by the scheduled start date. If these conditions occur, your MRP and surplus status will automatically change.
After Max finishes the Pull from On Hand process, he will then refer to the MRP process table to review any notes from the vendors he orders materials from and continues to create the purchase orders.
 To create a Purchase Order, Max goes to the Vendor Activity Center and selects the Vendor for the PO. He selects the Purchase Orders tab and clicks [Insert]. ProfitFab asks if the PO is for Outside Services or regular material. Max clicks [No] on the system message—this PO is for regular material.

Max could also create a Purchase Order from the Purchase Order Table.

Max can click the [Process MRP] button to see what products need to be ordered for this vendor.

 Max views MRP by the Current Vendor. This view displays all MRP requirements for the vendor he is making a PO to. After clearing out all items that can be pulled from stock, he selects items for the PO and clicks the [(Un)Mark] button to select them for the PO. After items are selected, he clicks the [Ok-Post to PO] button and the PO is updated with all the selected items.
The vendor for this PO supplies mostly sheet and structural type material. Max opens each line item on the Purchase Order Line Form (Detail) and clicks the [Add Round Qty] button to round the items to their next purchasing unit of measure. He returns to the Purchase Order Form, checks his work for accuracy, selects a contact, checks the Verify box, and checks the Email PO box to email the PO to the contact.
You may have a separate delivery date (Need-by Date) for each line item on the PO. If you have items you want to receive different from the global delivery date, then these dates will be listed with the line item on the PO.

A detailed Receiving Form can be printed when verifying the PO. This will give Bertha, the shipping/receiving clerk a detail listing of the jobs and materials in case she wants to label the materials as they are received with the jobs they were originally ordered for.

When creating a PO, you may mix and match the different processes. You may add items manually for stock, Process MRP, change quantities on MRP inserted items to include extra stock, or order items not used on jobs like office supplies.
Scheduling the Job
While for material to be received and waiting to start the actual production of the job, there are still things going on in the background. The job has been scheduled by both the station scheduler and the operation scheduler. The programmer has already logged into the job, tracked his time spent laying out the part, and writing the G code for it. Below are some screenshots which reflect the actions of the station scheduler and the operation scheduler.
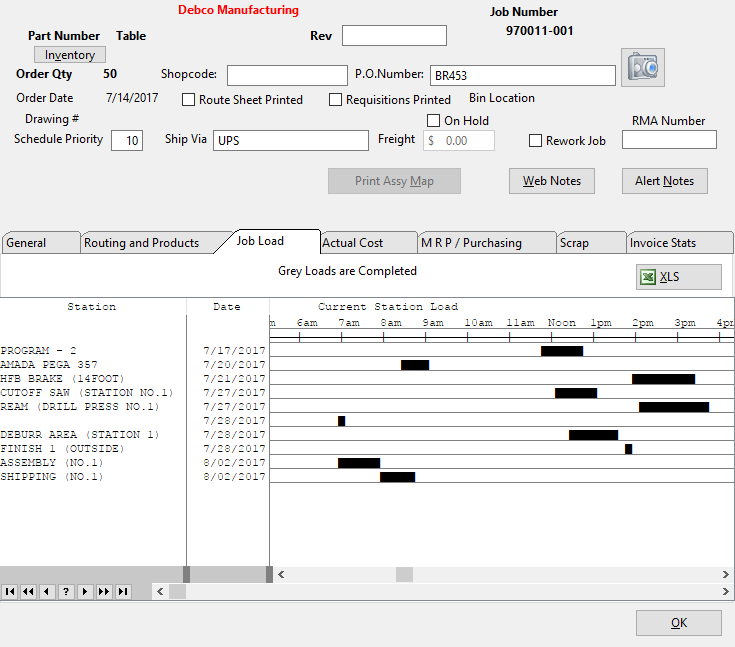 From the Station Scheduler Job Form, the gray load for the Programming station indicate that this operation has been completed already.
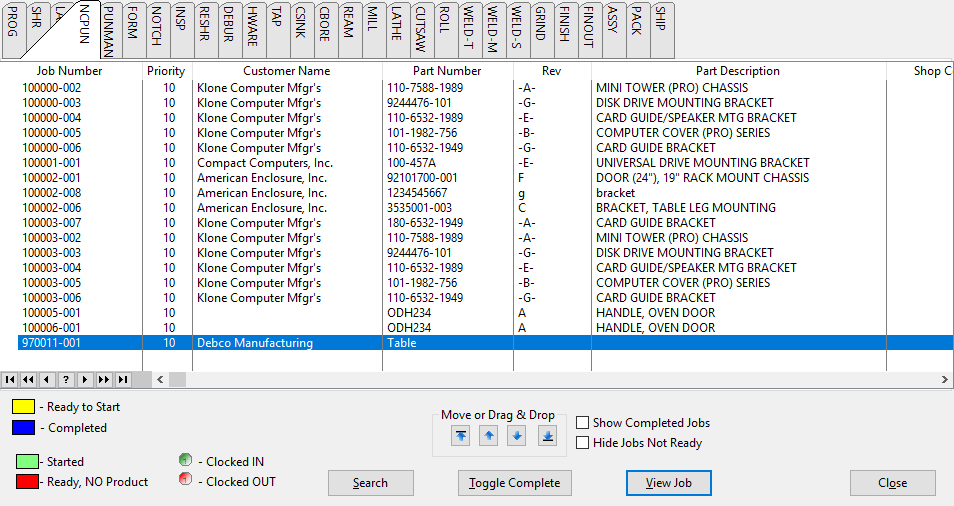
The screen below is the Operation Scheduler. The Search feature allows you quickly find all operations for a specific job. From the search table, the Punching (NC) operation follows the Programming operation and is next to be worked on. The Red marking of the job means material is required and has not yet been received. When material for this job has been received in the system the job prompt will turn Yellow indicating that nothing is preventing this job from being started.

Receiving Material
Bertha, the Shipping/Receiving clerk, receives some materials, including material needed for the Debco job. She fills out the Receiving Forms and Max enters the receipts into the program.
Max takes the receiving forms and opens the Purchase Order Table in ProfitFab. He selects the Purchase Order in the Pending Receipt tab and clicks the [Receive Products] button to open the Purchase Order Receiving Form.
 The Purchase Order Receiving Form contains a table showing all line items from the PO. To receive an item, Max selects it in the table and clicks the [Change Receipt] button to open the Purchase Order Line Receiving Breakdown Table.
This particular PO only contains one line item, but if it had multiple line items, Max would receive them one at a time.
Bertha could actually perform the receiving function at her workstation, directly from the shipping tickets, without the need to print a Receiving Form in ProfitFab. This would update the system in real time and reduce the amount of paperwork needed to perform this task.
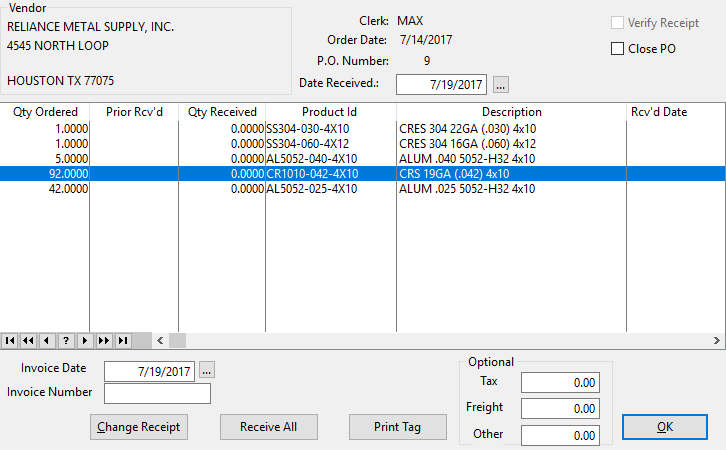
 In this table, each entry that made up the line item is shown. If a material had been ordered for multiple jobs, it can be received against a particular job in situations where a partial delivery was made. Or, it can be received against all jobs by clicking the [Receive All] button. Clicking the [Enter Receipts] button will bring up an edit form for the selected line and will default to the amount ordered.
Max clicks the [Receive All] button, answers the Receive All prompt affirmatively and returns to the Purchase Order Receiving Form.
 Max enters an Invoice Number for the vendor invoice which is to follow and verifies receipt of the material. When he clicks the [OK] button, several things are going to happen in the system.
First, a vendor invoice will be created that reflects the received shipment. Since the program needs an invoice number to create the invoice, Max enters the purchase order number in situations when the invoice does not come with the shipment. This makes it much easier to find in the invoice table when it does come in.
The second thing that happens is that ProfitFab updates on-hand inventory for the amount of material just received.
The third thing is that ProfitFab takes a snapshot of how much of the material was currently on hand and the current inventory price and saves it along with the quantity of the material just received. Then, when the vendor invoice does come in and get processed, ProfitFab uses these values to update the average inventory cost of the material.
Finally, once receipts are entered and verified, ProfitFab automatically updates jobs and schedules with this information. Vic, the supervisor, can make decisions about the production schedule based on this information.
Max could use the internal message system to let Vic know that material has arrived for specific jobs.
Once Max enters receipts into the system, he runs the Red Flag Reports to investigate which deliveries are missing and what other material he needs to order.
The Red Flag Off Schedule Purchases Report finds any open POs that should have already been received. This report shows all past due POs that may cause jobs to ship late.
The Red Flag Order to Stock Products Report finds items that need to be ordered to replenish stock levels. These items are not ordered specifically for jobs. These are the types of items that are bought in bulk and usually marked “Pull from On Hand” when Max processes his MRP. For each of these types of items he has set up a Min/Max level (or Stock Level) and Reorder Point.

The Job Form image above reflects the receipts Max entered. Below, the Operation Schedule reflects that the NC Punch operation is ready with the necessary materials.
Reviewing the Operation Schedule, Vic sees that material has been received for jobs and moves the jobs to the top of the list.

Working on Jobs – The Shop Clock Module
The Shop Clock Module is designed for capturing data from the shop floor. The shop floor data is actual time/labor put into the operations on the job, actual material allocated and used for the job, the completion of operations, and the amount of parts completed. The Shop Clock Module can also be used to report parts that have been scrapped for any reason.
The basic screen most employees will see in the Shop Clock Module is the Timeclock Entry Form. This form allows employees to indicate what job(s), operation, and station they are working at. All of the job-related information needed on this form can be found on the Job Route Sheet. Route sheets can be set up with barcodes and a bar code reader can be installed on shop floor computer terminals esay and accurate data entry.
 David Lodge is a Punch Operator. Vic informs him that Job # 970011-001 is ready to start production and gives him the routing package containing the route sheet, drawings, and other documents related to the job. David takes the route sheet and scans in the information at the shop clock terminal using his employee badge to scan in his Employee ID. He sets up the punch while another employee brings him the sheet material needed for the job.
David has several methods to find out what jobs he should be working on:
- Vic could give him a copy of the Station Schedule Report for Punch # 1.
- Vic could give him a copy of the Operation Schedule Report for the Punch Operation.
- David could view the Operation Schedule from within the Shop Clock Module to find jobs that are ready to be worked on at the Punch.

Route Sheets may be customized for individual preference. Several layouts are included with the Report Designer to choose from. The location, font, or size of any fields can be changed. Fields can also be deleted and custom text inserted anywhere on page. Even a picture of the part can be included on the Route Sheet.
 David is allowed to clock into the Punch operation because it is on his list of Assigned Operations. Other employees who are not assigned to work on the NC Punch can not clock into this operation.
ProfitFab can be set up to automatically pull material from inventory when employees clock into the operation where the material is to be used. When set up this way, employees will not have to respond to the following screen prompts about material usage. The program will allocate material as it is defined in the Part Definition on the job and employees can manually edit material usage in situations where substitute material was used or quantity used was different from the Route Sheet specifications.
 After David finishes working on this job, he returns to the shop clock computer terminal and enters the information to clock the job out. The program knows that material was supposed to be used at this operation, so it asks him via a popup message. He clicks [Yes] to update material usage on the job. This opens the Job Product Usage Form.

On this form, David can do one of three things. He can click the [Attach Product] button to attach material that was not originally on the route sheet, as in the case of substituting one material for another. He can click the [Edit] button to manually enter the amount of the selected material used on the job if the amount used is different from the amount called for. Finally, he can click the [Auto Update] button to automatically have the system allocate the entire amount of material that was called for on the job. David needs to click the [Edit] button to manually enter material usage.
 Clicking the [Edit] button to open the Part Product Update Form, David enters the quantity of material used and, for tracking purposes, enters the PO # the material was purchased from. He clicks [OK] to return to the Job Product Usage Form. He clicks [OK] on this screen to save the data.
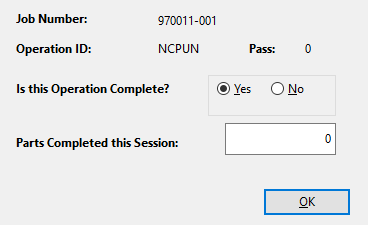 The program asks if the operation is complete and how many parts were completed during this session. David enters the information and clicks [OK]. He can now clock another job into the system and continue working while other employees come to the shop clock computer terminal to enter their job information. Once information is entered at the Shop Clock Module, it is immediately available to the rest of the system.
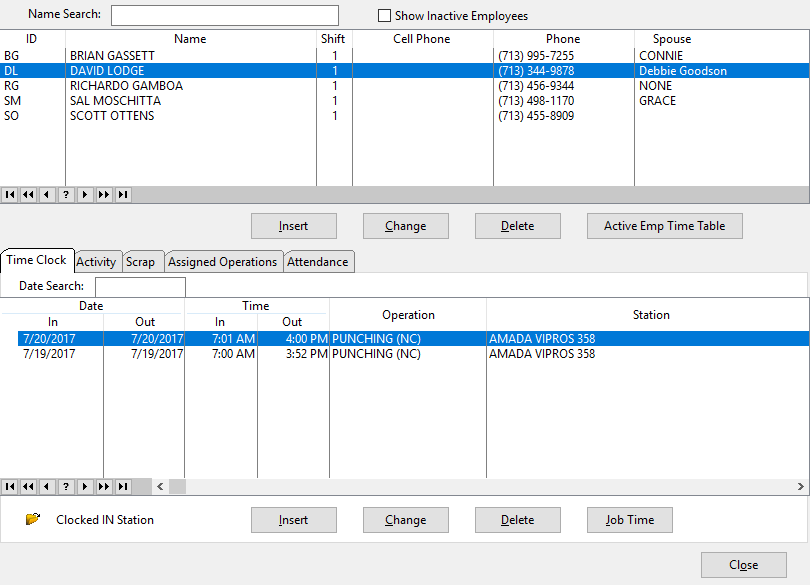
 The Employee Activity Center shows David’s time record for the day. Clicking on the [Job Time] button shows the jobs David worked on while clocked into the Punch Operation.
 Viewing the Actual Cost tabs on the Job Form show the time and material accounted for at the shop clock terminal.
After finishing his operation, David takes the route packet to the employee who will perform the next operation. The job flows through the shop to each step as indicated on the route sheet. Each employee clocks the job in and out of their respective operations, and where necessary, updates the material usage on the job.
After the Debur operation is completed, the parts are taken to Bertha. She will prep the parts for an outside service at City Paint Shop for powder coating. Bertha clocks into the Finish (Outside) operation to track the time required to prepare the parts for shipping. When finished, she clocks the job out of the operation and indicates that the operation is complete.
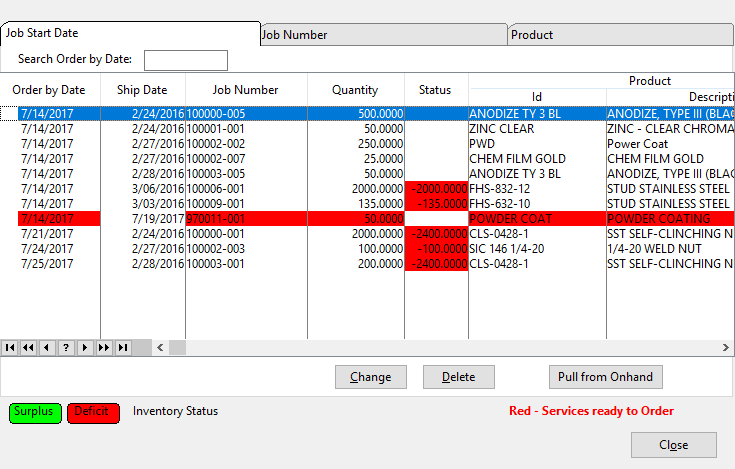
As Max checks on MRP, the outside services that are ready (the operation has been marked complete) show up in Red, making them easy to identify. Max creates the PO and prints a Receiving Form for Bertha.
Bertha could use the internal messaging system to let Max know that the parts are ready to ship to the outside vendor.
Alternatively, Bertha could also create the PO herself as long as she is set up as an administrative user with the appropriate security.
Tracking Job Status and Shop Capacity
Tracking Job Status
Part of Vic’s task description as shop supervisor is to be aware of where jobs are located in the shop. There are several places to find job status information. From the Job Form, he can view the current status of the job by clicking the [Refresh Status-Cost] button.

Gina, the receptionist, can also view the Job Form and keep Bob Baker from Debco Manufacturing updated if he should call and ask for a status report.
The Active Job Status Listing uses filters and sort orders, such as active jobs by Customer.

The Work In Process (WIP) Report gives Vic summary or detailed information about active jobs with regards to actual costs accumulated compared to estimates. With this information he can determine if jobs are running on budget and on time.

When running the Work In Process Report, use the % Filter as follows:
% Filter = 1% to weed out jobs that have not yet started
% Filter = 100% to find jobs that have gone over budget on labor and/or materials
Tracking Capacity
There are several reports for tracking future and past capacity. Future capacity reports are used for planning and identifying bottlenecks in production. Past capacity reports are used to measure how productive your shop has been in utilizing the available capacity.
Future Capacity Reports
Future capacity reports include the graphical Operation Load Report and the Operation Forecast Report. The Operation Load Report is an infinite load report that displays available capacity and capacity required by jobs due to ship within a given time period. The Operation Forecast Report is a finite load report based upon data in the Station Scheduler. This report tells how much capacity is available, how much time is in the schedule, and how much of the time in the schedule is allocated to jobs that are going to ship late.

Past Capacity Reports
Past capacity reports include the graphical Capacity & Time Report and the Operation Time Detail Report. The Capacity & Time Report provides a graphical layout of available capacity and actual time allocated to setup, rework, and normal time for a given date range. The Operation Time Detail Report shows actual job time allocated to an operation during a selected date range.

Completing and Shipping the Job
After a couple of days, City Paint Shop returns the parts sent out for powder coating. Bertha receives the parts just as she did with the regular material shipment. The parts are returned to production status and the Assembly operation is completed. (Plus and Lite versions have limited Completing and Shipping functions)
Once the Assembly operation is completed, the job returns to Bertha for shipping. She clocks into the Shop Clock Module on the Shipping operation.
When clocking the job out of Shipping, the program opens the Ship-Complete Job Form.
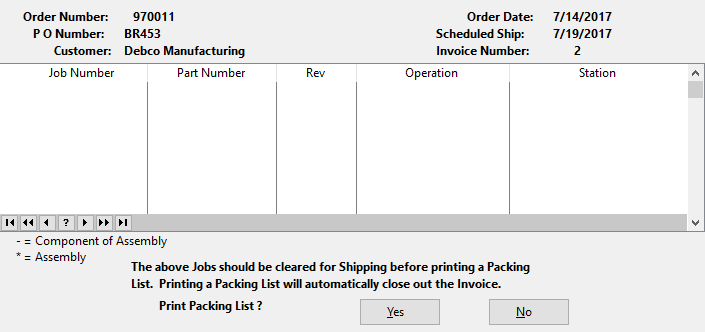
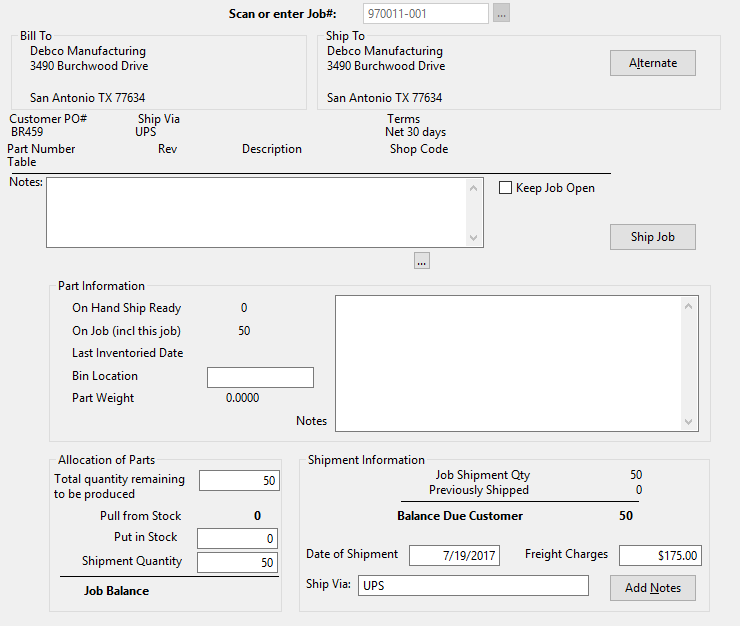 Bertha checks the information on the screen and enters the Freight Charges. She clicks the [Ship Job] button and the program will alert Bertha of any other jobs from the same customer order and same ship date in case there were other jobs that need to be shipped with this one. However, this was the only item on the customer’s order, so there are no other jobs shown in the Packing List Incompleted Jobs table. She clicks the [Yes] button to print the Packing List.
Packing Labels are not needed for this shipment, so she clicks the [No] button when prompted for printing them.
Jobs can be shipped from within the Administrative program in the Company Job Activity Table. Packing Lists/Slips and Packing Labels can also be printed from the Invoice Form.
You can also bypass the extra screens that open when clocking a job out of the Shipping operation and ship the job by clicking on the Ship-Complete Jobs icon within the Shop Clock Module. This icon can be password protected to ensure security on who ships jobs from the Shop Clock Module.
Invoicing the Customer
Once the job has been shipped and the Packing List printed, the invoice automatically created by the system can be found in the Company Invoice Table under the Shipped folder. Terry, the accounting person, monitors the Company Invoice Table for new invoices in either the Working or Shipped folders. When new invoices appear in the Shipped folder, he knows that the parts have been physically sent to the customer. His job is to verify the invoice and send it to the customer.

Terry opens the Customer Invoice Form by double-clicking the invoice in the Company Invoice Table. The invoice opens and he reviews the information against the customer’s purchase order. He verifies the shipping charges added by Bertha from the shop clock module. He double checks the terms for Debco. The price is correct and agrees with both the customer’s PO and the order entered into ProfitFab. Everything on the invoice looks correct so he clicks the Verified radio button, clicks the Invoice checkbox, and clicks [OK]. The invoice prints for delivery to Debco Manufacturing.
