
Entering Initial Information
Before getting started in ProfitFab, you will need to set up default information about your company, your customers, your users, your employees, and other items. The following sections will step you through this process.
Plus and Lite versions will display only information associated with its respective version.

User Information — Important!
There are two types of ProfitFab users: administrative users and shop floor users. For the purpose of this discussion, the term “users” will refer to the administrative users and the term “employees” will refer to your shop floor personnel. Entering employee information is covered later in this guide.
Note: Entering user information should only be performed by someone who will eventually have full supervisory rights within ProfitFab.
When you first log into ProfitFab, you used the Supervisor account built into the system. This account cannot be deleted and it doesn’t have a password. Use the User Table to give the Supervisor account a password and then set up your own supervisor account. This is important because anyone with Supervisor Rights will be able to access all of ProfitFab. To begin the process, go to the Files pull-down menu in the upper left corner of the ProfitFab window and select User.
Once you have changed the default Supervisory account password and entered your own account into ProfitFab, you may then add a user with less security to enter in the data for other areas of the program. However, only a user with Supervisor rights may add or edit other users.
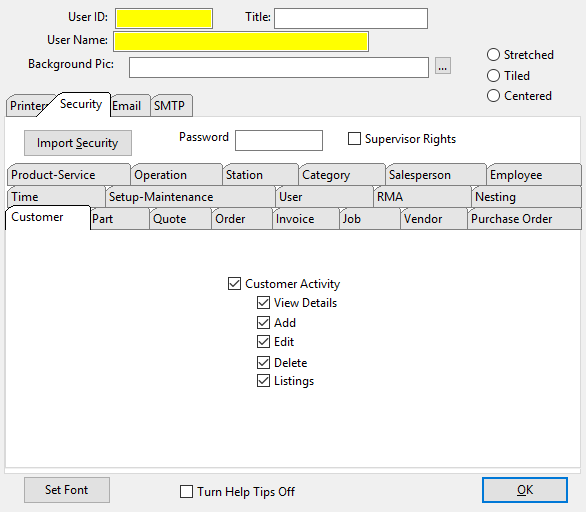
 From the User Table, select the Supervisory User Account and click the Change button. On the User Form, select the Security tab and enter a password of up to 6 characters. Click [OK] to save the password and close this form.
At the User Table, click the [Insert] button to open the User Form again. This time enter your User ID, Title, and User Name. The User ID field can be up to 10 characters long and this will be the name you enter when logging into ProfitFab.
For now, don’t worry about the Printers setup. Reports will print to your Windows default printer.
Click on the Security tab, enter your password, and check the Supervisor Rights box next to the Password field. Click on OK to save your changes and close the User Form.

You can now add another user account for someone to begin entering in the rest of your System data.
At the User Table, click [Insert] to open the User Form. Select the Security tab and enter a new User ID, Title, User Name, and Password. Make sure the Supervisor Rights check box is NOT checked.
The best approach to giving users security within ProfitFab is to create the users and give them security to fit their job functions. The demo data in ProfitFab has users whose security is set up in this manner. You may use the security from the demo users as a model to tailor your own employees security settings. If you have multiple employees who have the same job functions, set up one employee then use the [Import Security] button to import that employee’s security settings into another employee’s record. Otherwise, by default, when creating new employee user accounts, ProfitFab will give them all security with the exception of Supervisor Rights.
Company Information
 To enter your company’s system information, log into ProfitFab, go to the Setup pull-down menu, and select System to open the System Information form.
Some fields are self-explanatory, such as your company address and phone numbers. Some fields contain default information that can be changed to fit your company’s profile as needed.
For field definitions, click F1 to access ProfitFab Help.

If you have not already done so, enter the Company Name and Registration # that was provided to you by ProfitFab. These fields are part of the registration security and must be spelled exactly as they were provided to you. If the spelling of your company name needs to be changed in any way, contact ProfitFab Customer Support so we can provide you with a new registration code based on how you want your company name to appear in the program.
Continue to fill out information as necessary, providing your address, phone numbers, default data for Ship Via, and F.O.B. (Freight On Board).
Check the box for Enable Message System if you wish to use the internal messaging system. Check the boxes in the Print on Preprinted Form block only if you use custom forms made with your company logo on the letterhead. If you want multiple copies of the reports listed in the Copies to Print, enter that number next to the report. In the Filenames area, click the ellipse button next to each file type to find the programs associated with each of the functions listed. For the CAD viewer, do not use a program with CAD editing capability if you do not want your shop floor personnel the ability to edit your CAD drawings. When you are finished, click on the Customer, Part Info tab.
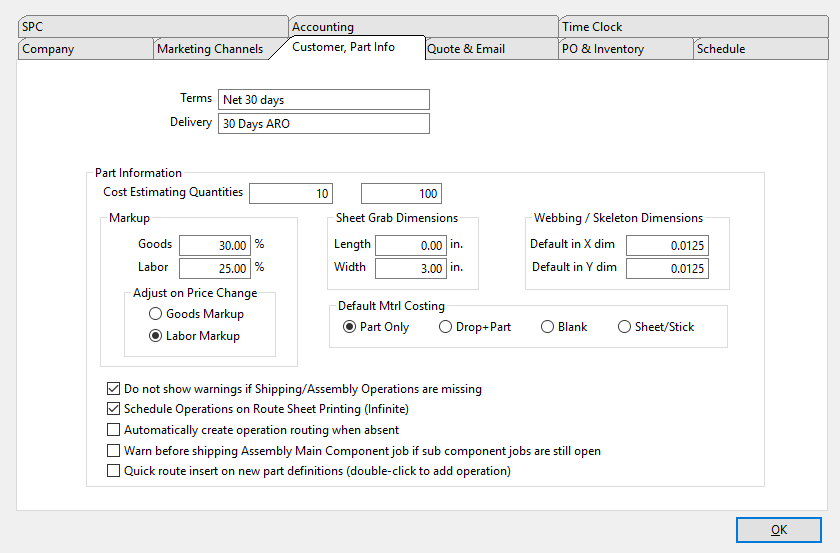 On the Customer, Part Info tab, enter your normal terms for new customers and normal delivery method. Enter the tax rate that is accurate for the majority of your customers. Enter your desired markups for the Goods and Labor fields. Enter the default length and width of sheet grab for the equipment you use with sheet and structural material. When finished on this screen, click on the Quote & Email tab.

Enter a memo to appear on your quotes, the number of days your quotes are usually valid for, and a greeting. On the actual quote, the customer contact’s name will be entered automatically after the greeting. If desired, enter a Signature and Title to appear on quotes. If you want to email forms to your customers, enter the name of your SMTP outgoing mail server. You can either find this information in your default email program or you may have to contact your Internet Service Provider (ISP) to find this information. If you would like to receive a copy of every email that is sent from the program, enter an email address into the BCC (Blind Carbon Copy) address field. When you are finished on this screen, click on the PO & Inventory tab.

Enter your company’s receiving address, even if it is the same as your mailing address. Do not check the box for Automatically mark “Pull from Stock” on MRP. This is a setting that you can investigate once the system has been running for awhile and your inventory has stabilized in the program. Check the box for Substitute Shop Code for Part Number on Service POs if you do not want your customer’s part numbers to show up on POs. Leave the boxes unchecked for updating product quote costs and inventory costs. In the two quantity range fields, enter the most common quantities for which you normally receive price breaks from your vendors. Remember, these are default values that can be changed for each product item you have. When finished on this screen, click the Scheduler tab.
 Set the Global Lead Time to 1 day and the Global Trail Time to 1 day. Make the Global Efficiency 100% and the ASAP Window 14 days. Check the boxes for Schedule Job on Order Verification and Give all working jobs highest priority. In the Shift Schedule block, enter all shifts you are running (up to 5) using 24-hour notation, where 1600 is 4:00pm. This shift schedule is for shop floor employees and not necessarily for your administrative staff. Leave the Round to nearest set to None and the Employee Grace Times set to 00:00 with the boxes unchecked. These are covered in more detail in ProfitFab Help (Use F1). When you are finished on this screen, click on the Time Clock tab.
 Set up the Time clock tab just as you see it set here in the picture. We will discuss the settings on this screen in more detail later, but these settings will be sufficient to get you started. After the changes are complete, you have set up ProfitFab to build parts, create quotes, orders, jobs and purchase orders. The SPC and Accounting information can be setup at a later date when you are ready to begin using those features. They are covered in detail in ProfitFab Help (F1).
Calendar Information
 Calendars are used by the Station Scheduler to assign work to stations. The Station Scheduler schedules stations and not employees, so the calendar setup should reflect the capacity of equipment to operate. The main idea is to have a calendar to cover any possible station operating time. For example, you may have a punch machine with an automatic sheet loader that is capable of running 24 hours per day and you may have a welding station that is manned from 07:00 to 16:00. These two stations should be assigned to different calendars so that the scheduler can assign work to each station in the most efficient manner. Setting up stations (and Operations) is covered in detail in the next section.
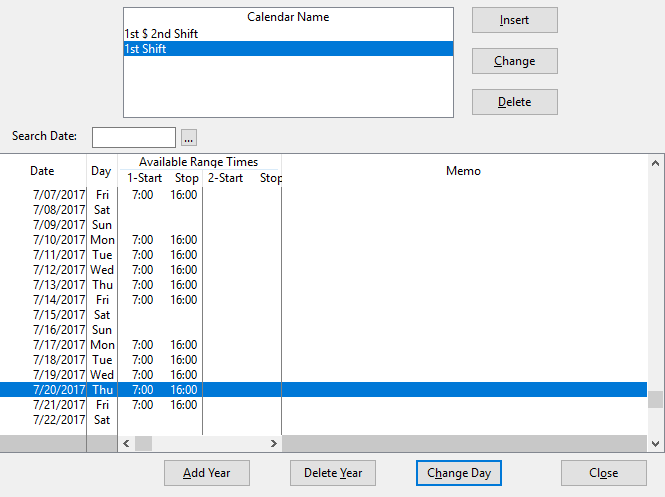
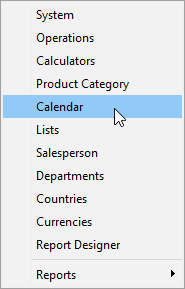
To set up calendars, select Calendar from the Setup pulldown menu. This will open the Company Calendar Schedule. By default, there is already a Normal calendar installed with a time range set from 08:00 to 17:00. If you run a single shift during these times, then the Normal calendar will work for you without making any changes. If you normally run only a single shift from 07:00 to 15:00, the easiest way to set up the calendar would be to delete the years from the current calendar, then add new years with the correct time range.
To delete years, click the [Delete Year] button. Type in the year to be deleted and click the [Delete Year] button. Continue this process until all desired years have been deleted.
 To add a year with the new time ranges, click the [Add Year] button. The Calendar Year Extension Routine opens. Make sure the Year to Add has the correct year and enter 0700 and 1500 into the Start and Stop fields for Range 1 for Monday through Friday. When complete, click the [Add Year] button. A message confirms adding the year and asks if you would like to add another. If so, click yes and the form will open again allowing you to add another year using the same times. Continue this process until you have added several years into the calendar.
If you have equipment that runs on a different schedule than what you have already set up, insert a new calendar to account for this and add some years to it. To insert a new calendar, click the [Insert] button and give the new calendar a name. We suggest something descriptive such as ‘24 Hours’ or “1st and 2nd Shift”. When adding a 24 hour time range, enter the data as 0000 in the Start field, and 2400 in the Stop field. Note that when adding 0000 for a start time, the field will not display 00:00, but will be blank to indicate 00:00.
When you have finished setting up your calendars, click the [Close] button to exit the Company Calendar Schedule screen.
Operations and Stations Information
 Operations are the building blocks for Part Definitions and jobs. Employees are assigned operations and clock into and out of these operations during the normal flow of a work day. Therefore, it is important to set up operations in a way that makes sense.
To enter operation information, you need to list all equipment that is necessary for manufacturing customer parts. This list of equipment needs to be categorized into types of operations. For example, you may have three press brakes, one 4ft. press brake and two 6ft press brakes. You would insert one operation called Press Brake and have 3 stations under the Press Brake operation.
To set up operation information, choose Operations from the Setup pull-down menu. If you elected to install the startup data from the installation wizard, you will have several operations in the operation list. The existing operation information can be changed to meet your needs.
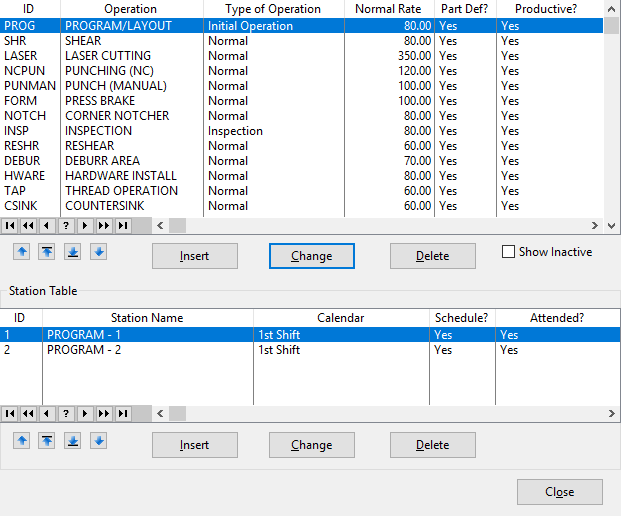 Operations may be sequenced in the order they would generally pass through the shop by using the [Up] or [Down] arrow buttons. The [Up] arrow will move the operation highlighted on the screen up one line and the [Down] arrow will move the highlighted operation down one line. The [UP] and [DOWN] arrow buttons with the lines will move an operation to the top or bottom of the list.
Whenever you have an operation highlighted, its stations are listed in the Station Table. We will cover setting up a station next. First let’s see how to set up an operation. To insert a new operation, click the [Insert] button in the upper table to open the Default Operations Form.
The Station Table and various associated scheduling fields are not available in the Plus and Lite versions.
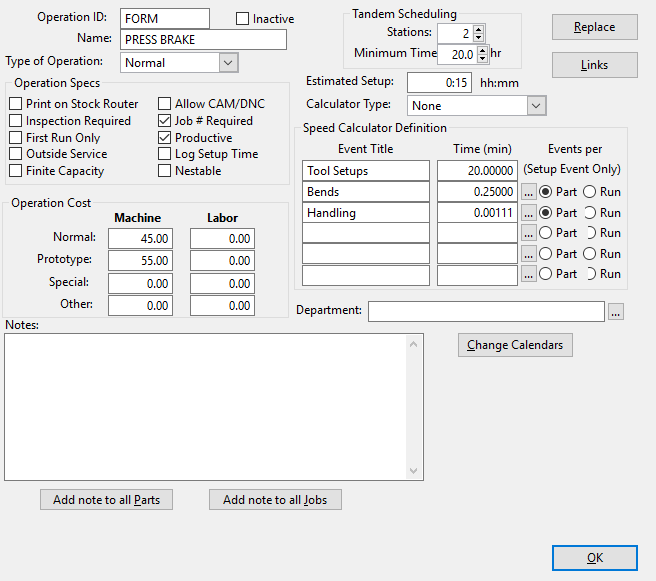 Enter an Operation ID. This field is used for quick reference in looking up and/or inputting the operations into the customer part files. If your company currently uses operation billing codes in an accounting or shop management program you may choose to use the same codes as the Operation ID in order to ease implementation.
The Name field is used to define the operation. This description should be named in such a way that it accurately describes the actual operation to be accomplished by your employees.
Type of Operation: In setting up an operation you must define the Type of Operation. This setting will have various affects throughout the program. You may select the Type of Operation from a list by selecting the down arrow button. The types available are as follows:
- Normal: This is the most common type of operation; it covers most of your productive work stations.
- Inspection: This defines the operation as an inspection point. This works in conjunction with the inspection required function of the Operation Specs. When entering an operation to the routing table of a part that has the inspection required checkbox selected, the system will require that the next operation added to the route table to be an inspection type of operation.
- Shipping: This defines the operation as a shipping/completion point. Upon entering the operations list you must have at least one operation with the shipping type selected. This operation should be the last operation in the routing table of all simple parts and the last operation in the routing table of a main assembly. The Station Scheduler also uses the Shipping Type of operation to define standard work days in your shop for scheduling purposes.
- Assembly point: This defines your operation as an assembly point. This operation should be the last operation in the routing table of all the component parts that are attached to an assembly. This tells the system that the component parts of an assembly are complete and have been attached to a parent component or to the main assembly. You may want to set your welders, hardware install, etc. operations as an assembly point so you don’t have to add a special assembly point operation.
- Initial Operation: When selected, the employee clocking out of this operation will have the option to edit the actual quantity of parts to manufacture, routing table, hardware table and to print the Shop Route Sheet or Purchase Requisitions, etc. The scheduler also views operations of this type as not being full production type operations and will not assume that a job has begun production just because an initial type operation has logged time against it.
Operation Specs
- Job Number Required: By checking this check box the system will further define the operation to require a job number be entered when an employee logs into this operation from the shop clock module. This field is to be checked for all operations that will appear on a route sheet. If not checked it will not be available for selection on route tables when estimating parts. Do not check this box on an operation such as CLEANUP or MAINTENANCE that is not job route specific.
- Inspection Required: By checking this check box the system will further define the operation by forcing the system to automatically prompt the user for an inspection operation after adding this operation into the routings of a customer’s part file.
- First Run Only: This check box is to flag the system to only charge this operations labor time on the first run only. By selecting this check box the system will only calculate this operations labor time as set in the routing of a customer’s part file for this operation until the part has become a verified order. This is commonly used for the programming and layout operations.
- Outside Service: This check box is to flag the system that this operation is to be performed by an outside vendor. Normally, you only need one operation in the entire list that is of this type. Whenever an outside service is to be performed on a job, this operation can be inserted as needed, and the specific service to be provided can be assigned to the Part Definition.
- Log Setup Time: This check box is checked if you want employees to log setup time separate from per part time. It is recommended to not log setup time until employees are comfortable with the shop clock module. You may change this field at any time to automatically require setup time to be logged.
- Productive: By checking this check box the system will consider this operation as a productive operation and give employees logging in to this operation credit for productive work. Normally this field is checked on job route related operations and not checked on operations such as CLEANUP or BREAKS.
- Print on Stock Router: Check this box to print this operation only on From Stock Route Sheets. You may choose the operations that will be printed on route sheets that have no manufactured quantities and are to be pulled from stock for shipping. This option is useful when you have an assembly with many components that will be shipped from stock and you don’t want to print route sheets for the components (Only the main assembly route sheet will print.). This will be the default used on newly created parts, but may be changed in the part definition if the part needs special attention on printing certain operations when shipping from stock quantities. Also these flags may be changed at the job level (Job Activity Folder) if you want to change a currently running jobs route sheet. Note: Operations with a ‘Shipping’ Type will always print on route sheets even if this checkbox is not checked.
- Allow CAM/DNC: If this box is checked and the part definition of the job has a CAM/DNC file attached, the system will automatically prompt the employee when logging into that operation if he wants to download the CAM/DNC files. If answered ‘YES’ then the employee will be prompted with a list of files to view, edit, or download.
- Operation Cost: In these fields you should put the costs per hour for each of the four price options provided. You will choose from this list when building individual Part Definitions. These costs should include all labor and overhead costs necessary to operate the equipment. It is very important to set these costs up correctly because these are the values ProfitFab will use to calculate the labor cost of making parts when you are creating quotes for your customers. If you try to pad these values with some extra profit, then when ProfitFab adds your markup to the costs, you may be over-quoting your prices and subsequently losing business as a result.
- Tandem Scheduling: Do not worry about this feature at this time. This is used by the Station Scheduler and is covered in detail in ProfitFab Help (F1).
- Estimated Setup: This field is used to set the default (average) time it should take to prepare the operation to begin production. (NOTE: This is only the default and can be changed on a per operation basis from within the routing table of the customer’s part file). Setup time for operations may include complicated tool setups, time required to get parts to the station, or any other activity that is required to be done before starting the production work.
- Calculator Type: If the operation you are working with has a predefined Detail Calculator available, select it from the list by selecting the down arrow button. Calculators are currently available for operations such as Laser Jet, Water Jet, NC Punch, Plasma Cutting, Welding and Grinding. You can add calculators to the list to meet your needs. For more detail on the calculators see the Calculator section in ProfitFab Help.
- Speed Calculator Definition: The Speed Calculator Definition area has been structured to allow you to assign quick calculators for any operation. You may define a calculator for the Setup Field and up to five calculations for the per Part or per Run fields. For getting started, do not worry about assigning these fields. They will be addressed in detail on the Default Operations Form in ProfitFab Help (F1).
Notes: The notes field on the Operations form may be used to enter a default note which will transfer to the operation routes on parts automatically when adding operations to existing or new parts. You may also use this feature to ‘seed’ a unique heading to each operation on your route sheet.
Example: On Inspection you may have a place for your employees to initial the phases of inspection.
1st Insp. _________ 2nd Insp. _________ Final Insp. ________
After entering the desired information for the new operation, click the OK button to save your work and return to the Default Operations Table.
 To set up stations for operations, click the [Insert] button in the Station Table. This opens the Station Form.
Station ID – used for quick reference in looking up and or inputting the stations into the shop time clock when logging into a job. If your company currently uses station billing codes in an accounting program you may choose to use the same codes for this field.
Station Name – used to give the tool or equipment a descriptive name that accurately defines the station.
Calendar – select from the drop down list the calendar that will be used by the Station Scheduler. The calendars must have been previously defined in the calendar setup.
Check the Schedule this station box and set the Schedule Efficiency to 100%.
Set the minimum number of employees that will be required to work at this station in order for a job to be worked on. Most stations will either be 0 or 1. If you have a station that can run unattended, either because it has an automatic sheet loader or because it can work on a job while the operator goes to work on a different station, then set this to 0. If an operation requires an employee to be present, for example welding or forming, then set to 1.
If only one job at a time can be worked on at a station, check the box. This would be for stations like welding, press brakes, etc.
The Parallel and Fragment settings should be left alone at this time. These advance scheduling features will be discussed in the Station Scheduler section of ProfitFab Help (F1). Click OK to save your work and return to the Default Operations Table. Enter new operations or modify the existing operations to meet your specific needs and when finished, click the [Close] button.
Customer Information
 To enter customer information, click the Customer Activity icon in the upper left corner of the ProfitFab window. The Customer Activity Center allows access to all customers, their quotes, orders, parts, jobs, invoices, and contacts. From this window, you can access most of the features in ProfitFab. To add a customer, click the [Insert] button to the right of the customer table. This will open the Customer Form.
 Enter a Customer ID. This ID is used for quick reference in looking up and retrieving your customer data files when adding or editing your customer’s part file, quotes, and orders. If your company currently uses an accounting or shop control program you may choose to use the same customer ID codes in order to ease implementation. If you use Peachtree accounting software and you want to export data into Peachtree, you must set up a customer in Peachtree using the same Customer ID.
In the Mfg. ID field, enter the customer’s original equipment manufacturers code (if applicable). This is generally a number that your customer supplies to you for identification purposes. Enter the customer’s billing and shipping addresses in the fields provided. The customer’s name should be entered into the first field of each. The Terms, Delivery, and Ship Via fields will default to the values that were entered in your company setup. If necessary, change these fields to reflect the correct values for this customer. The Last Invoice, Last Inv. Amt, and Period Volume fields will automatically be updated by ProfitFab, so do not worry about these fields now. If this customer is taxable, then check the Taxable box and enter the tax rate.
If the customer will allow you to ship more parts than were ordered, check the Allow Overage box. If you wish to require a Purchase Order from this customer before allowing an order to be created, check the PO Required box. This will require a customer PO number to be entered on any orders and invoices for this customer. If this customer has a web site, you may enter it into the Web Site field for informational purposes.
The First Activity and Last Activity fields will automatically be updated by ProfitFab as activity occurs for this customer. In the Customer Priority field, you may enter a number between 1 and 99, where 1 is the highest priority. This field is used when you schedule jobs. Jobs with the highest priority get scheduled first. If you leave this field at 0, then all jobs for this customer will default to priority 10. If you set this field to any number between 1 and 99, all jobs for this customer will default to that priority. You can override this priority level for each individual job that you have.
Enter any notes that are specific to this customer into the Notes field. If you check the Alert Note box, then the notes entered for this customer will open up to alert users every time they access this customer’s file. If this customer has more than one shipping address, you may enter Alternate Shipping addresses by clicking on that tab and then clicking the [Insert] button.
If there are contacts for this customer, enter them by clicking the Contacts tab and then clicking the [Insert] button. If entering multiple contacts for a single customer and they have common information such as the same address, phone number, etc. use the tilde (~) key on a field to automatically insert the previous value used in that field. Using this feature will save time by not typing repetitive information. This shortcut key will work in many areas of ProfitFab. Click the [OK] button to save your work and return to the Customer Activity Center.
Employee Information
 Entering data for shop floor employees is not the same procedure as setting up administrative users. If a person is entered as both an administrative user and an employee and the internal message system is used, enter the admin user and the employee with the same Name to prevent sending duplicate messages. To enter employee information, click on the Employee icon. This will open the Employee Activity Center.
 This screen is similar to the Customer Activity Center. The top half contains a table of all employees and the bottom half contains records associated with the employee selected. From this screen allows access to time clock, activity, scrap, and assigned operation information about the selected employee. To enter a new employee, click the [Insert] button to the right of the employ ee table. This opens the Employee Form.
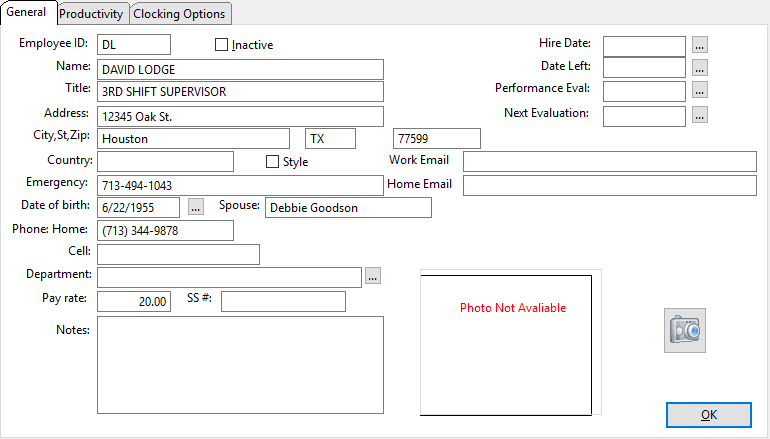 On the General tab of the Employee Form, enter the requested information. The Employee ID and Name fields are required, all others are optional. For the Employee ID, enter up to 8 characters. This is the ID that employees will enter to login to the Shop Clock Module.
In the Shift block, select the appropriate shift for the employee. Shift times will be shown for each corresponding shift. If a shift does not exist, it will show 12:00AM to 12:00AM. For startup, do not worry about disabling lookups on the 2 fields listed. As you use ProfitFab more, you may want to come back to these fields to disable some of them. The Inactive box should be checked only for employees that no longer work for you. This allows a history of the work they have done without having their records show up on all employee reports.
Do not worry about the Productivity tab information at this time. As you use ProfitFab, the program will accumulate productivity information automatically. When finished entering the desired information, click [OK] to save your work and return to the Employee Activity Center.
The final step to entering an employee is to set up the operations that the employee will be allowed to clock into. With the employee highlighted in the upper table, select the Assigned Operations tab. You can select the Import All button and delete unwanted operations.
During initial setup, there is no need to make entries in the Time Clock, Activity, and Scrap tabs. ProfitFab will automatically maintain this information, although you still have the ability to manually insert and edit this information.

Employee Pay Rate and SS# fields are only visible to users with Supervisor Rights
Vendor Information
 To set up vendor data, click the Vendor icon. This will open the Vendor Activity Folder. From here, you can access all vendor activity including purchase orders, products, invoices, and contacts. If you elected to have demo data installed by ProfitFab, you will see some vendors have been setup with generic names based on product types. If you already have a primary vendor for these types of products, set up these vendors by selecting the appropriate vendor from the table and then clicking the [Change] button. Replace the ID and Name fields with the correct vendor information and fill out the rest of the fields with the requested information. When finished, click the OK button to save.

 Enter a Vendor ID. This field is used for quick reference in looking up and/or inputting the vendors into the raw product inventory files. If your company currently uses an inventory tracking program you may choose to use the same vendor codes to ease implementation. If you use Peachtree software for accounting and want to export vendor information from ProfitFab to Peachtree, then you must set up a vendor in Peachtree using the exact same ID.
Enter the Vendor Name and Address. Enter the terms which the vendor extends to you for payment of invoices and their usual shipping method.
To insert contacts for this vendor, click the [Insert] button to the right of the Contacts table. Enter at least one contact for each vendor. Purchase orders to the vendor will be addressed to the contact choosen at the time you created it. Enter the requested data in the Vendor Contact Form. At a minimum, the contact’s first name and last name are required. Click [OK] to close the Vendor Contact Form and return to the Vendor Form. Enter any special notes specific to this vendor in the Vendor Notes field. Click [OK] to save and return to the Vendor Activity Center.
Inventory Information
 Open the Product/Service Table by selecting the Inventory icon.

This table is broken down into types of product. The types are shown in the tabs across the top of the screen. Products can be viewed by type by either Product ID, Category, or Vendor by selecting the appropriate tab from within the table. You may add/edit the list supplied in ProfitFab’s demo data or enter your own list from scratch.
Select the type of product to be added and then click the [Insert] button. The Product/Service Form opens and the screen will vary depending on the type of material chosen. For the purpose of this demo, we will look at adding a sheet material item.
Various inventory related fields are not available in the Plus and Lite versions.
Product Types are broken down by dimensions and how the material is used. Sheet type material is any type of material that is used in 2 dimensions—i.e. it has a length and width component. Structural material is 1-dimensional—it has only a linear component. Hardware, Finish, Other, and In-House Parts are all 0-dimensional—their unit of measure may be EA, PC (piece), G (gallon), etc.


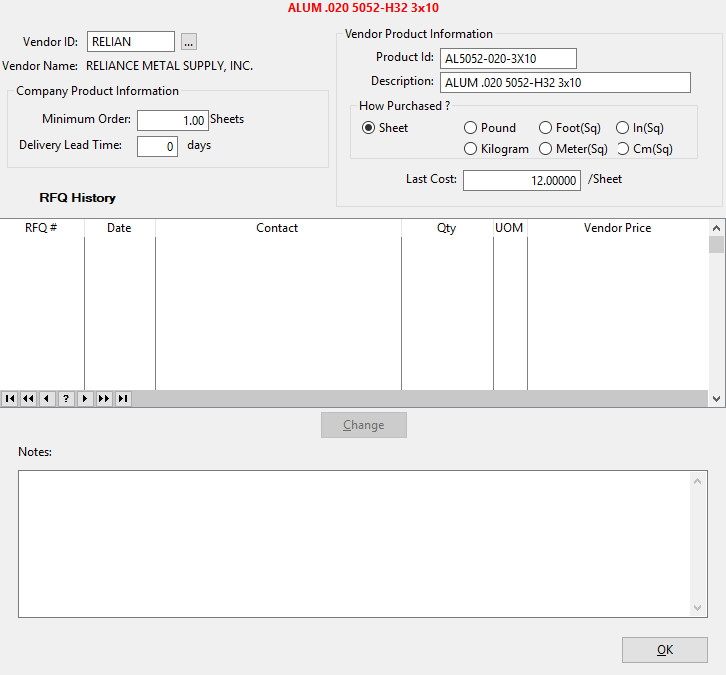 Enter a Vendor ID by clicking the ellipse button and selecting a vendor from the list. Highlight the correct vendor and click the [Select] button. If you know the Minimum Order size and Delivery Lead Time requirements for this vendor, enter those values in the respective fields. The Product ID and Description should already be filled in with the data for the product you are currently working with. This is the default value and it can be changed to match the vendor’s actual Product ID if different. This is the Product ID value that will print on your PO’s to this vendor.
In the How Purchased block, select the unit by which the vendor sells this product. If known, enter the Last Cost for this product. Click [OK] to save and return to the Product/Service Form. If the vendor needs a red check mark next to the ID, highlight the vendor and click the [Mark as Primary] button.
 On the Product/Service Form, go to the Properties block and enter the data to describe this product. These fields may or may not be present depending on the type of product you are currently working with. For instance, sheet material has all 5 fields present; Structural, Hardware, and Other material do not have a width field; and Services don’t have any of these fields. It is important to enter the correct values into the Length, Width, and Weight fields. This data is used when determining the actual cost of this material when it is used on a Part Definition.
If checking the Alert Note box, product notes will pop up every time someone works with this product in ProfitFab. If you do not check the Alert Note box, this field can be used for detailed instructions for outside service vendors and will print on service purchase orders.
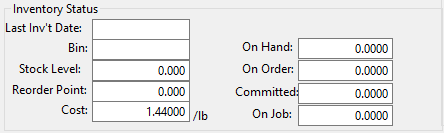 If needed, enter a Bin where the product is stored in the Inventory Status block. If you have just completed a physical inventory and know the amount of this product On Hand, then enter that amount. Leave the On Order, Committed, and On Job fields empty; ProfitFab will take care of these fields for you as you begin to use the program. Enter the current Cost per unit for the product. ProfitFab uses cost per pound for Sheet and Structural material, and cost per unit for Hardware, Finish, and Other types of material. If your vendor offers price breaks for this product, these breaks can be passed on to your customers by checking the Use Price Breaks box and setting up the quantity breaks and cost. Otherwise, enter a single price to use for quoting and estimating.
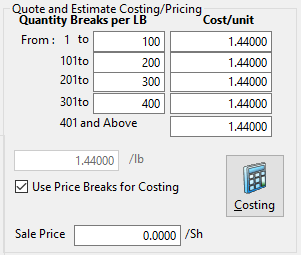
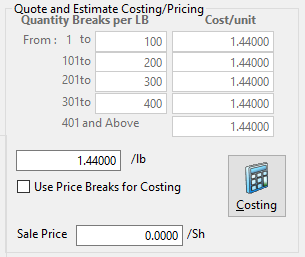
 A costing calculator is available to help figure the cost per pound/unit for products.

This feature is useful when the vendor prices the product differently than how ProfitFab prices the product. (Example: if a vendor prices sheet material by the sheet and ProfitFab uses cost per pound) Open the Sheet Material Calculator and enter the cost per sheet into the cost field under Stock and the calculator will calculate the Cost per Pound. Click the [OK] button and the cost per pound will be entered for you. Make sure the correct size and weight information has been entered.
During inventory setup, you may want to begin setting up default product categories. Insert new categories as needed while inputting your products or update all categories at one time by selecting Product Category from the Setup pull-down menu. Existing categories can be edited or insert new categories by clicking the appropriate button in the Category Table. There are only two fields associated with the category: the Category Name field and the Inventory G/L Code. The Inventory G/L Code field is optional and is useful if using separate codes in your accounting software to track material inventory.